Art Teacher Diaries
  • Home
  • Portfolio
  • About
  • Curriculum
    • Graphic Design & Digital Art 1
    • Graphic Design & Digital Arts II
Mrs. Quam's Art Teacher Diary
​Art lessons, resources, images, and more for visual art and graphic design classes. 

6 Classroom Games that Relate to Art and Graphic Design

3/10/2020

1 Comment

 
I've recently been trying to incorporate more fun into my art classrooms. My goal is to get students excited to come to art and graphic design class. One thing I've found that brings joy-- and even some social and collaboration opportunities-- is using games. I don't typically play an art-related game for an entire hour, but the following are art-related games I've researched and many that I've tried out in my own high school classrooms. Many of these games could be modified for younger students too.

#1 Exquisite Corpse

Picture
Don't let the morbid name scare you. It started as a Surrealist game in the 1920s and is similar to a Victorian-era parlor game called Consequences. Exquisite corpse is a great get-to-know-you activity for middle and high school students. It lets kids practice drawing skills too-- even if they feel like they aren't good at art. This one even gets my high school kids laughing like crazy.

Skills & Key concepts: Drawing, collaboration, imagination, character design, anatomy.
Time Required: About 10-15 minutes.
How to Play:
  1. Each student gets a paper. Have students write their name at the top right or left. 
  2. The paper can be portrait or landscape. Each student folds their papers into thirds of fourths horizontally across the paper. Then they open up their papers.
  3. ​Have students sit in random groups.
  4. Start by instructing students to start at the top part of the fold and draw a "head". I give students about 3 minutes to draw each body part. They can add color too.
  5. When time is up, I instruct students to fold their section towards the back so the next student can't see it. I do instruct students to continue some of the lines down slightly into the next section to help the next student out.
  6. Next, have students pass their papers to the right.
  7. The second section is the "abdomen". This could include the chest, stomach, and arms. After time is up, students pass their paper to the right.
  8. The third section is the "lower half" or just "waist and legs". I usually have to tell high school students to be school appropriate here-- no naked butts :)  After time is up, students pass their paper to the right.
  9. If doing four sections, the last section I call "Feet and ground". Students can add feet and a surface for the character to stand on.
  10. When finished, students pass their papers back to the original owner and open them up! Be ready for roars of laughter!
Picture

#2 Pareidolia Scavenger Hunt

I have used this in graphic design classes when introducing our photography unit, but you could do this in any class.

How to Play:
After showing the short video below, I give students 10 minutes to pair up and find as many "faces" as they can made of inanimate objects. I tell them they may have to rotate their camera, zoom in, or crop areas to get the best effect. I let students roam the classroom, go outside if the weather is nice, and even the hallways, cafeteria, and gym if allowed. Students record their finds with a smartphone, classroom camera, or iPad. Students can upload photos to a google classroom post. After time is up, the team with the most (or funniest) pareidolia photos wins!
​
​Check out this article for more info:
https://futurism.com/pareidolia-why-we-see-what-isnt-there
Picture
Skills & Key concepts: Photography, composition, creativity, teamwork
​

Time Required: About 10-15 minutes to take photos and 15-20 minutes to look at everybody's photos afterwards

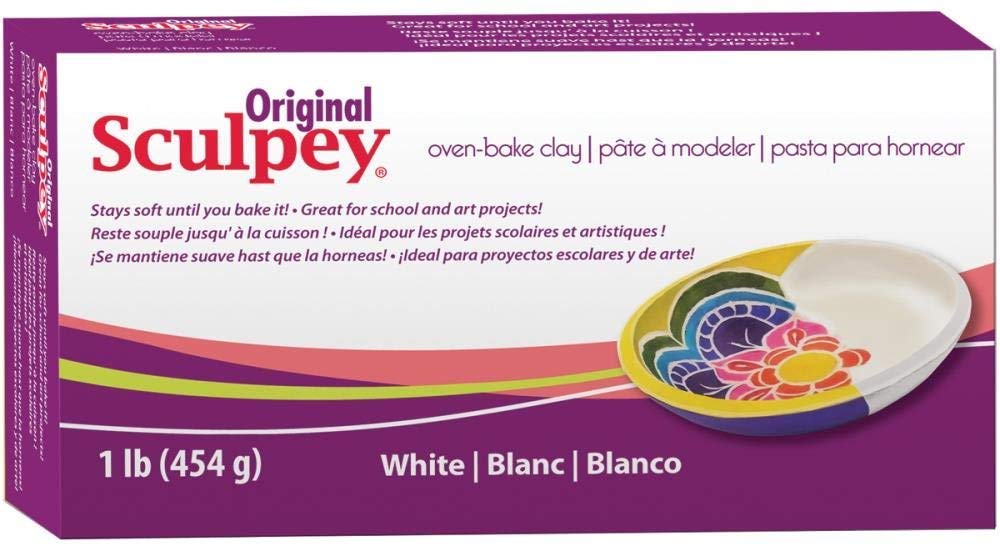
#3 Sculpey Pictionary

Have I told you how much I love sculpey? It doesn't dry out in the air, I can leave it in a box for ages, far more forgiving than genuine clay, and it's awesome for kids who just need to fidget!

How to Play:
Sculpey Pictionary is fairly easy to understand. I give each group of kids a 2-minute timer (like the ones to the right) and a ball of Sculpey about the size of a small apple. I cut up strips of paper with different words and put them in a bucket for each group of kids. Students take turns drawing a word and they have to sculpt it using the Sculpey in under two minutes. If one of their group members guesses correctly, the sculptor (and the student that guessed it right) gets a point! We play several rounds and then the player with the most points from each group wins (usually some candy or pencils from my "prize" box).

Skills & Key concepts: Sculpting, clay, 3-D design, vocabulary
​

Time Required: I typically do this for a full 50 minute class hour but you could probably do it in 20-30 minutes with smaller groups.
Picture
Picture
These inexpensive 2-minute timers are a great resource to have in the classroom! They aren't noisy too!
Picture
A 1 lb box of Sculpey is enough for about 6-8 groups. Divide the Sculpey up-- you may need to warm it up with your hands-- and let kids get creative!
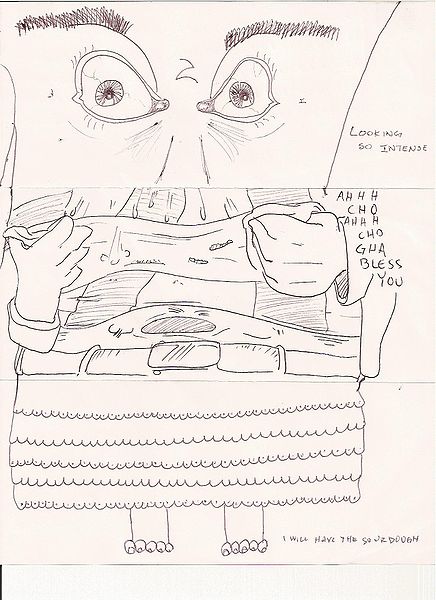
Need a list of pictionary words? Here are 138 different words at different difficulty levels I created for my classes. Download them free by clicking here!
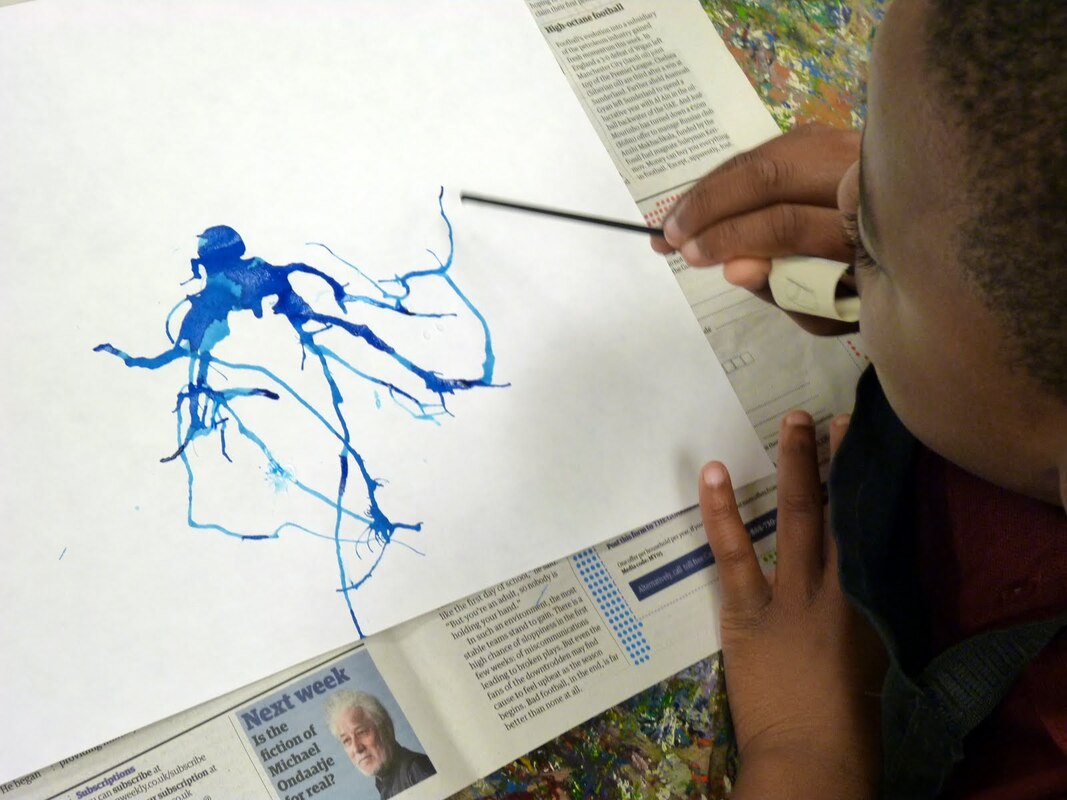
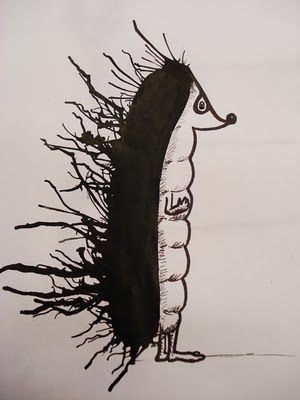
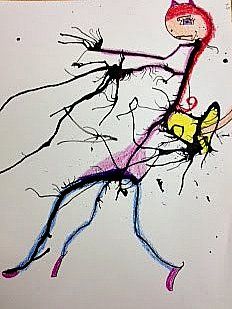
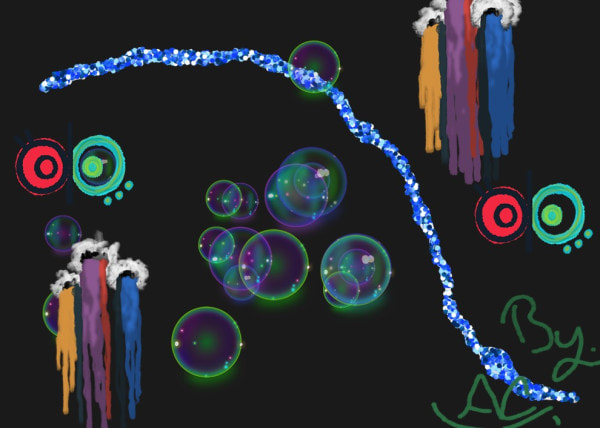
pictionary_words.pdf
File Size: 31 kb
File Type: pdf
Download File

#4 Ink Blowing

Picture
Skills & Key concepts: Creativity, line quality, imagination, collaboration

Time Required: I give students about 15-25 minutes to do this activity.
Picture
Picture
Super simple. Super fun. All you need are some straws, heavier paper, India ink, newspapers, possibly markers, and some brushes/calligraphy pens.

How to Play:
1. Give students a few drops of India ink (or even watered down paint) on a thicker paper such as mixed media, watercolor, or tagboard paper. 90# or more works best. Put newspaper or scrap paper underneath to catch any ink drips.
2. Next, give students a plastic straw. I cut the straw in half to save on over-using the plastic. You could also use paper straws instead!
3. Now let students blow the drops of ink all over their paper by blowing through the straw. Students are not allowed to use their hands or brushes-- only their straw! I give students about 5 minutes to do this.
4. When students are done, instruct them to think about what they could make out of these ink blowings. OR to make it more challenging, I pair students up randomly to exchange their papers. Then they have to think about what they could make out of someone else's ink blowing.
5. Students then proceed to use India ink with brushes, markers and/or calligraphy pens to turn their ink blowing into something more recognizable or interesting. I often allow abstract patterns and shapes too.
​6. When all students are done, we hang them up in the hallway for a quick gallery walk/critique.

This is a great way for kids to take a brain break and develop some creativity!

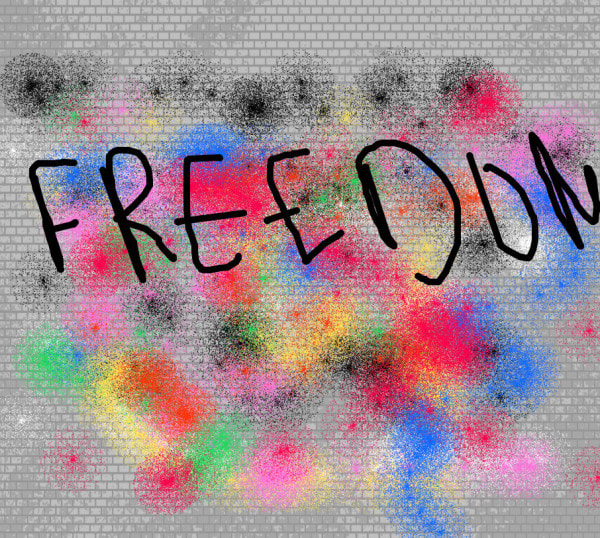
#5 Street Art Online Game
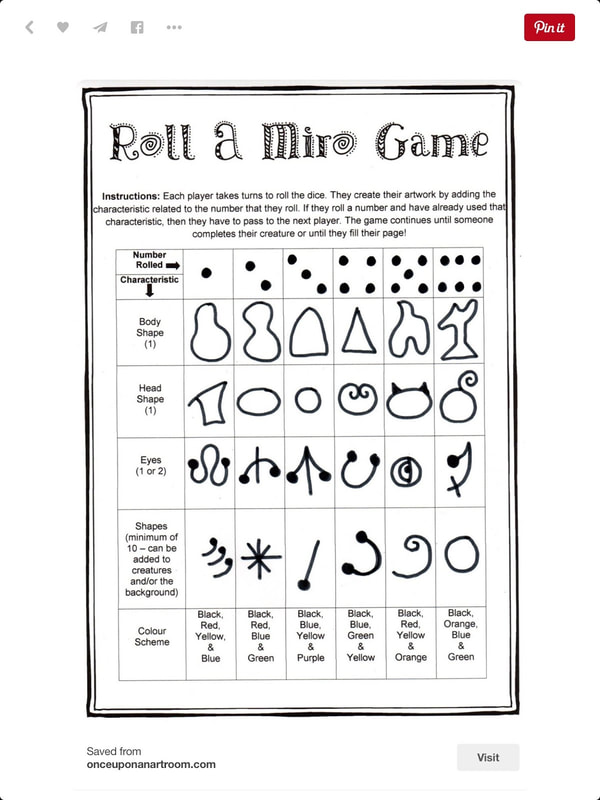
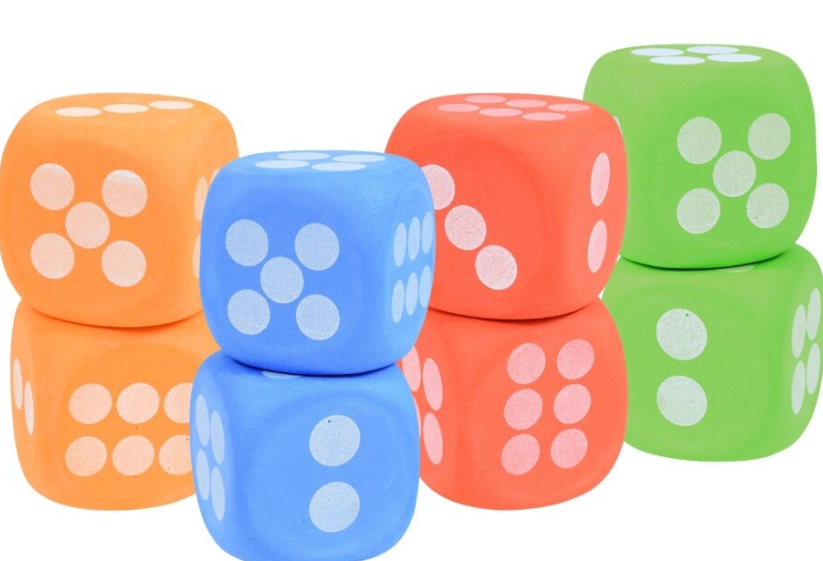
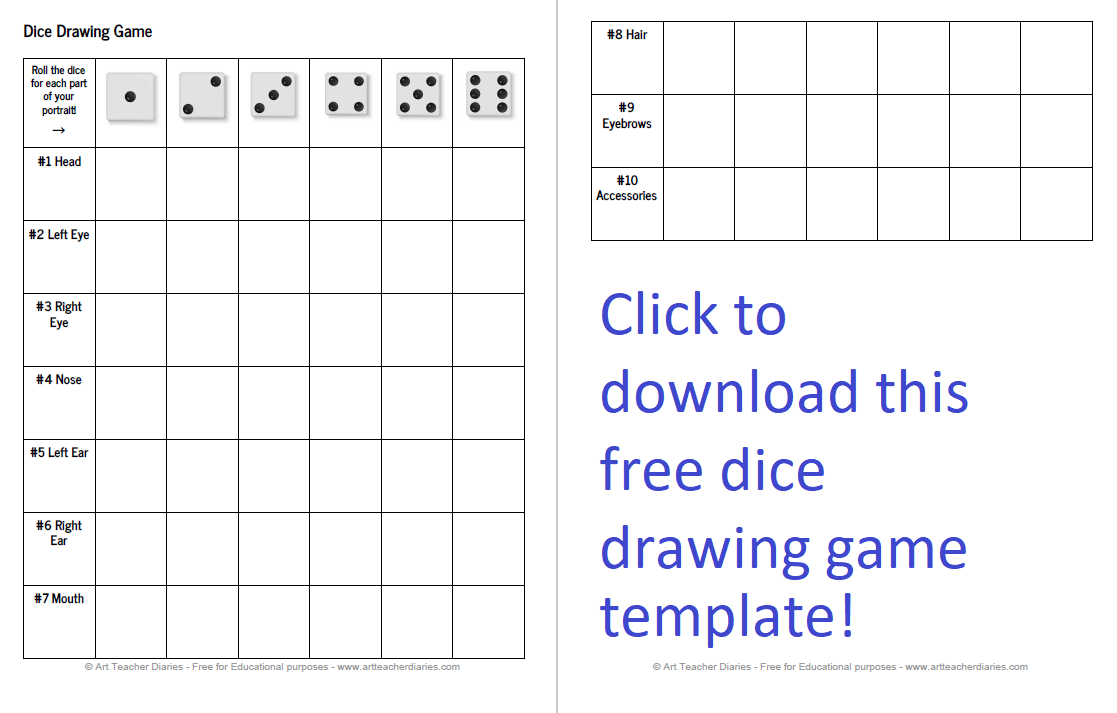
This game is online based, but it's kind of addicting so I had to include it.
This game was created by Tate and is available along with other art-related games on their website.
Visit here: https://www.tate.org.uk/kids/games-quizzes/street-art to check it out! I like that they provide examples of work that kids around the world have created on their website. You can see some examples to the right!

Skills & Key concepts: Street art, digital art, expressionism, computer literacy

Time Required: This ranges from a 5-minute activity to even longer for more complex works.
Picture
Picture

#6 Dice Drawing Game

Picture
Picture
Picture
Skills & Key concepts: Drawing, line quality, observational drawing, Cubism

Time Required: This usually takes about a full 50 minute class hour-- especially if I have students add color with markers, colored pencils, or paint!
Unfortunately I have not found the original source for this game since there are so many versions out there!

However, this game is super fun and not difficult to do with a variety of ages and abilities. I have created a blank PDF table (download it at the left or use the link below!) with the dice and different facial features. I have students draw ideas for head shape, left eye shape, eyebrows, etc. They can also write the ideas in words too.

Next, we roll the dice! I like the big foam dice found at the Dollar Tree in packs of two. They are quiet! However, you can also use an online-based dice roller such as https://freeonlinedice.com/. 

There are lots of teachers out there who have created different versions of these games. A quick search on Teachers Pay Teachers will reveal many options! However, I find that letting kids choose the "parts" makes it even more fun! You could even let kids work together to create all of the parts and collaborate. Feel free to download the dice drawing template I created below. It is free!
dice_drawing_game.pdf
File Size: 284 kb
File Type: pdf
Download File

1 Comment

Collaborative Animations between Elementary and High School Students

1/26/2018

0 Comments

 
Picture
My graphic design 1 students just finished a collaborative animation project. I connected with an Elementary art teacher about this project a couple months ahead of time. I asked her if she could have a group of 5th grade students draw characters, write what they want their character to do, and then send me the drawings. I ended up getting about 80 drawings and scanned each one to my e-mail.

Then, I uploaded the drawings as .jpgs to my Google Drive and sent a drawing to each graphic design student. I instructed my students that they had to animate the drawing according to the directions provided by the 5th grader. My graphic design students animated these in Photoshop...some students touched up the drawings a little, while others left the drawings as they were. Some students added photos or other images.

When all students finished, I put together a (not so little) Google Slide presentation to send to the Elementary art teacher so she could show her students all of our hard work! This animated gif project was a great way to connect with the younger student and share our program. We even got featured on the Rochester Public Schools Facebook page for this project!

​This was just so much fun and a great challenge for my graphic design students!  I will definitely be doing it again in the future!


0 Comments

Monster Soft Sculpture Stop Motion Animations

6/1/2015

0 Comments

 
As part of the monster soft sculpture project, I assigned students with the task of using their soft sculptures in a stop motion animation. I asked students to get into groups of 3 or less for making the stop motion animation. We used an app on the iPads called "Stop Motion Studio". The app is free and relatively easy to use. It took approximately 3 class times for students to finish their stop motion animations. I had students e-mail me the finished animation as a .mov file and I put many of them together in a video to share with the school.

Tips to Keep in Mind when Creating Stop Motion Animations:
  • Give students time to get used to the app. We spent one whole class experimenting with the app.
  • I think partners may have been a better idea since the 3rd person in each group seemed to have less to do. For example, one student moves the monster, while the other student takes the picture.
  • I used cheap wire easel frames to hold up the iPads. I got them for $1 each at the dollar tree and I can use them as display easels for displaying artwork.
  • Since students don't have accounts on the iPads, that meant that multiple classes were using the iPads and groups of students from different classes were saving their work on the app. This meant that another student could potentially delete another student's work. We ran into a couple cases where a student had done this...and I couldn't tell who did it. I strongly encourage you to stress the expectation that students are not allowed to delete other student's work. If each student had their own iPad, this wouldn't have been an issue. Just one of the limitations when you have a class set of 36 iPads to share with 600 6th grade students.
Picture
An example of the stop motion studio app
Picture
Wire easels worked great for holding up the iPads to take pictures while making the stop motion animations
I showed students the above video before teaching this lesson. It was a great anticipatory set for teaching about stop motion animation.
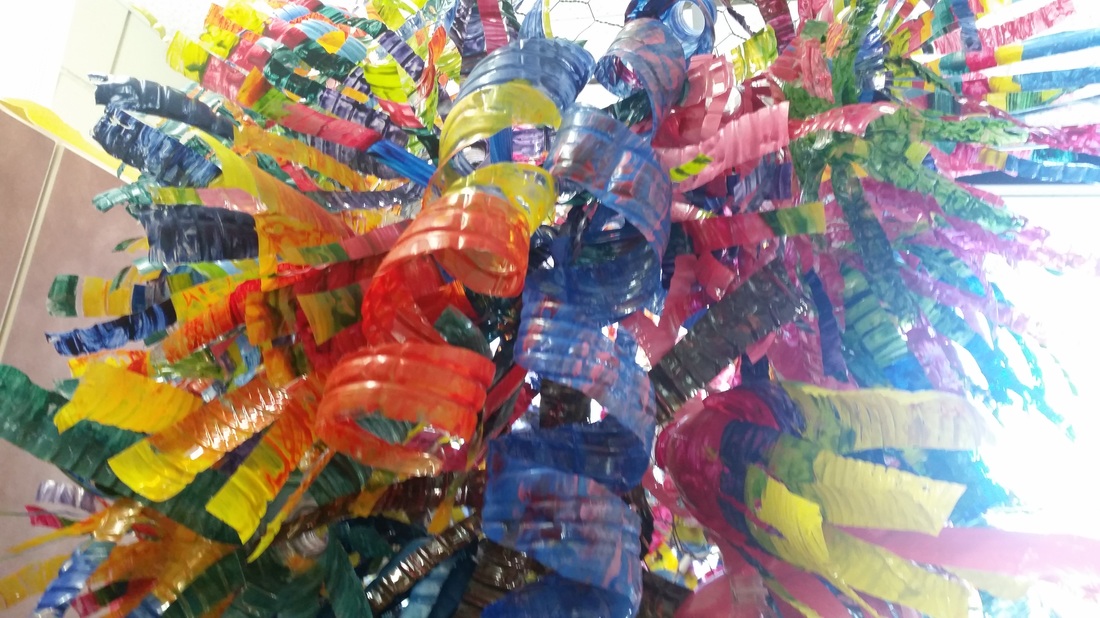
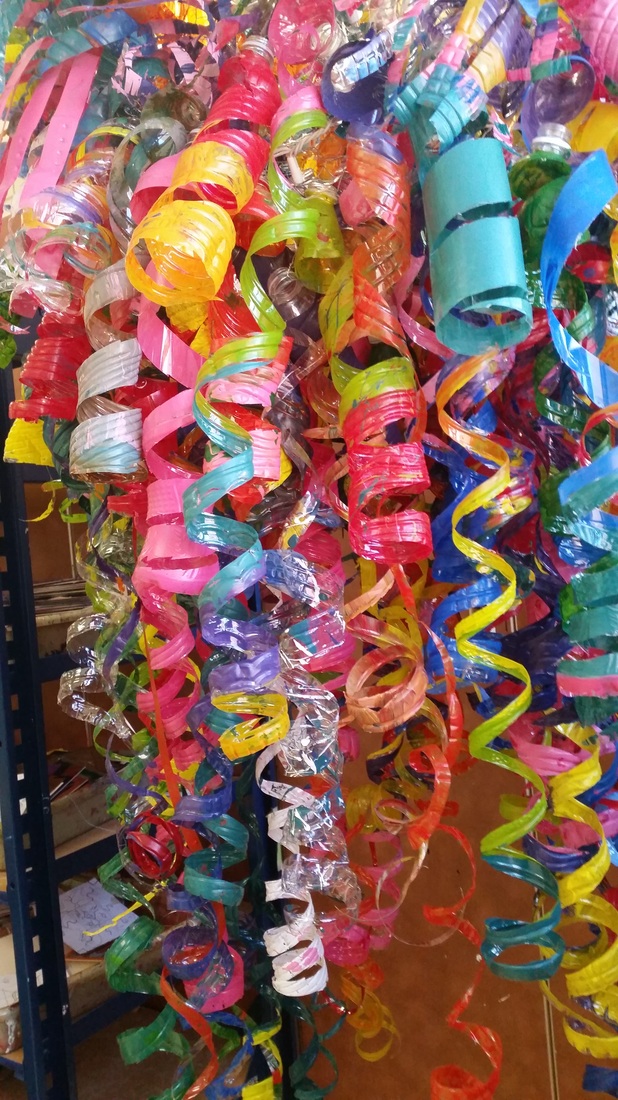
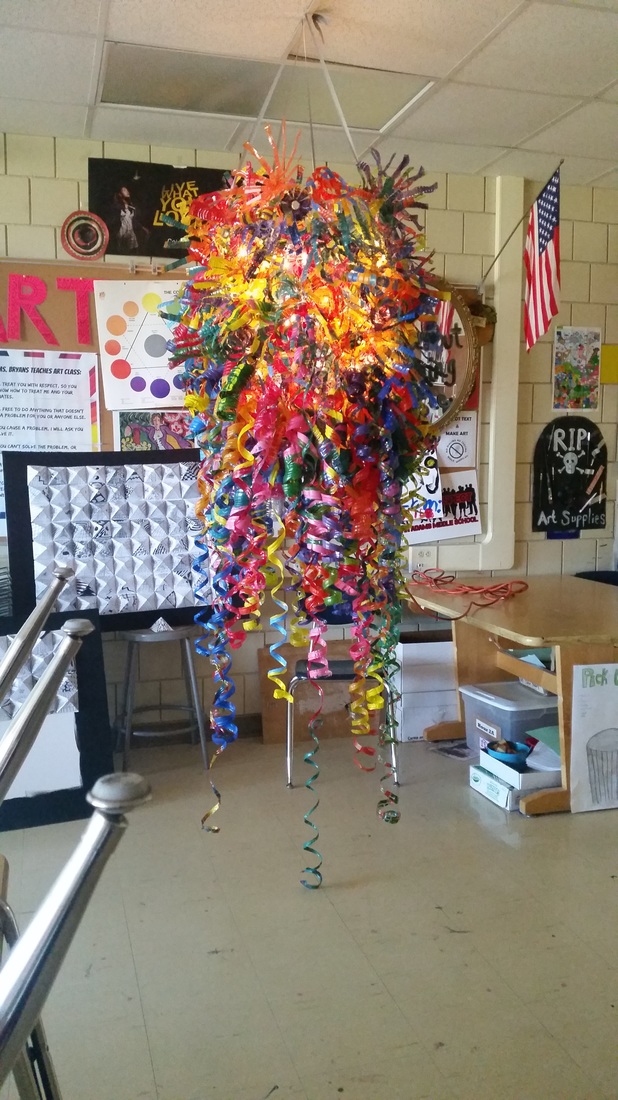
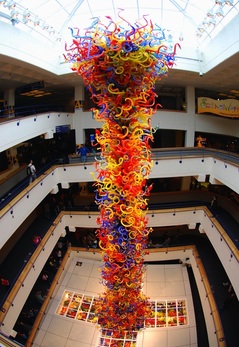
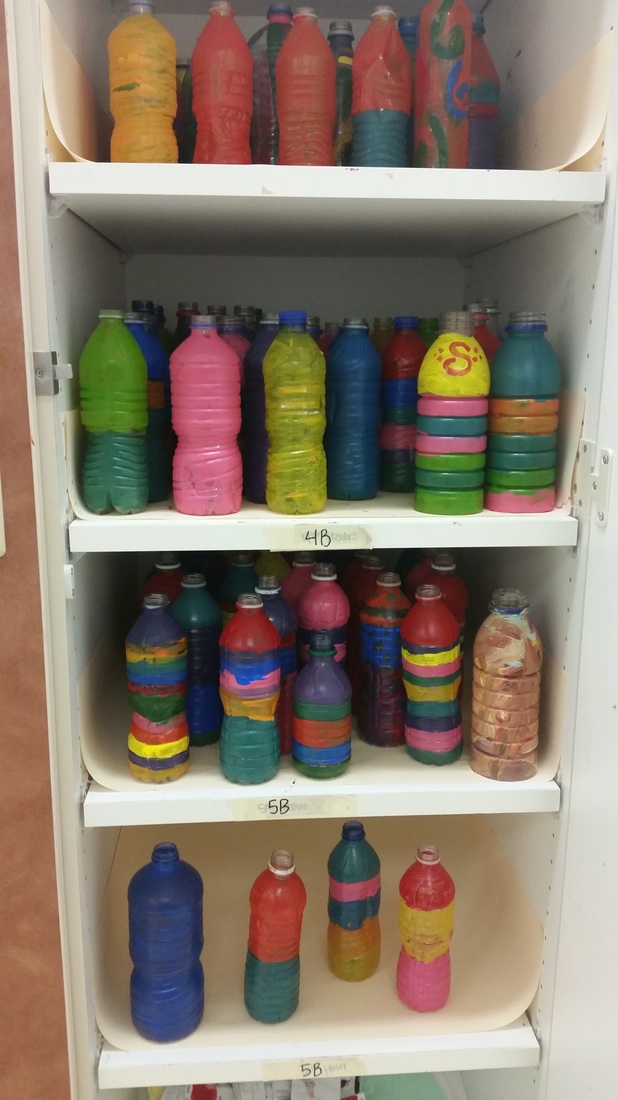
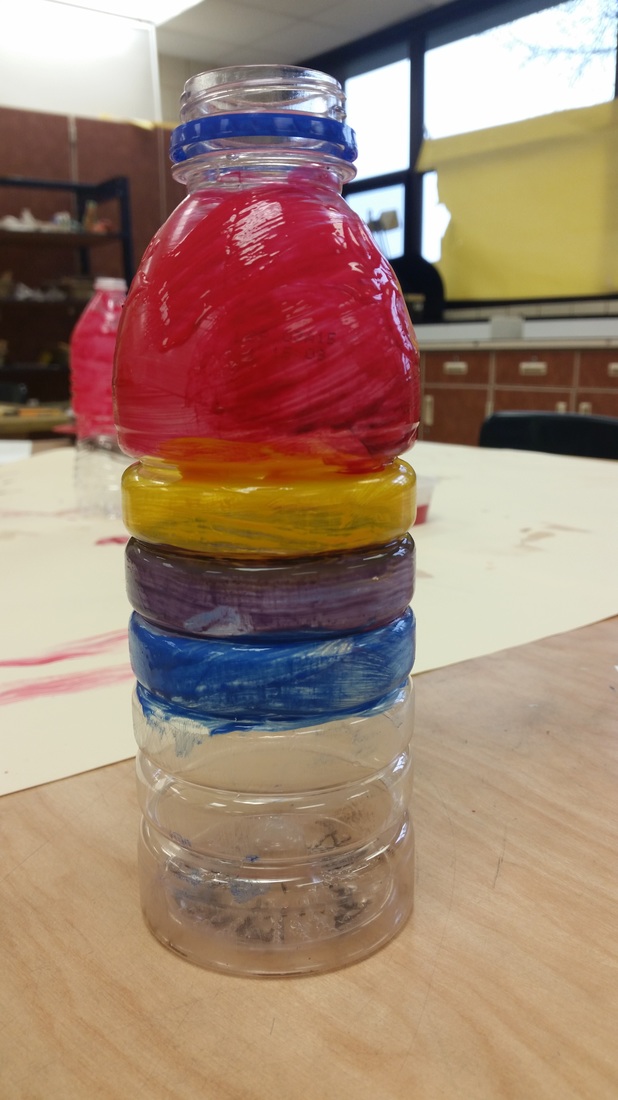
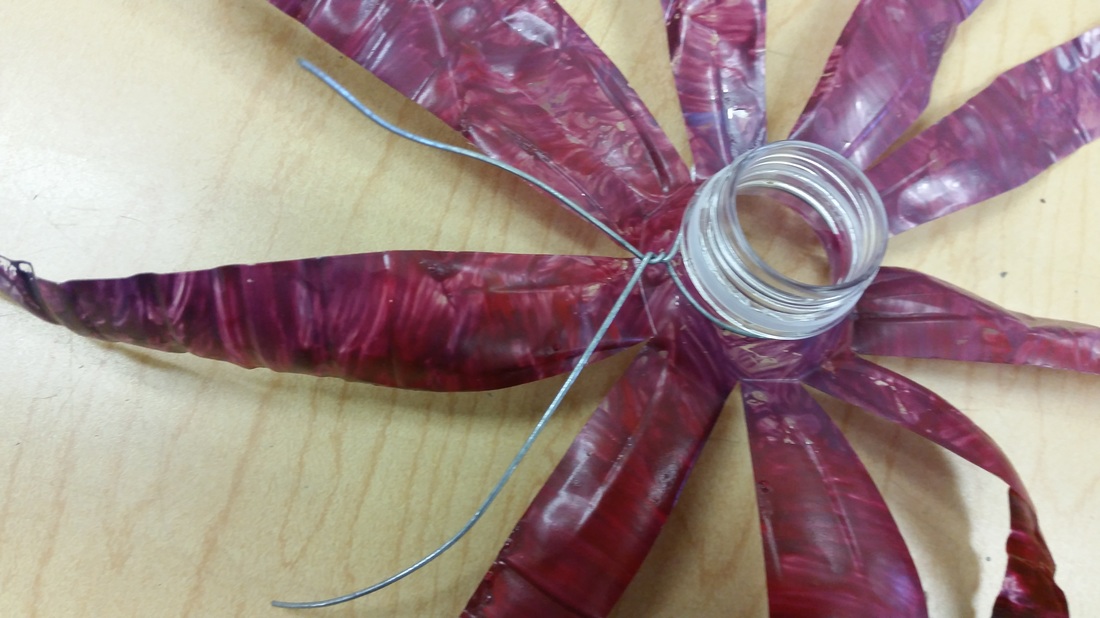
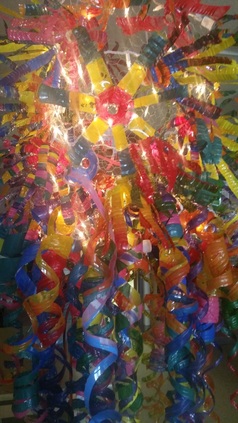
View the compiled stop motion animations below!
0 Comments

Chihuly Sculpture - Recycling & Art Combined!

4/1/2015

19 Comments

 
Picture
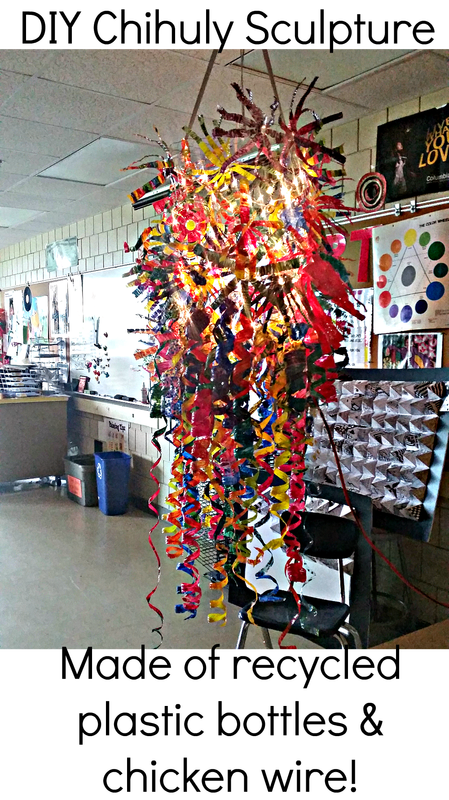
This has got to be one of my favorite projects to work on with my middle school art students. The project goes relatively quickly (2 class times) and my students love to learn about the glass artist Dale Chihuly. The sculpture in the picture above is made of 200 plastic bottles. Each bottle was donated by a student or staff member at our school. We started collecting bottles about 3 weeks before we started the project. Each student selected a bottle & painted it with acrylic. Acrylic paint works much better than tempera. Next, each student was assigned a style for cutting the bottle apart (star shape or spiral shape). Some students modified their styles slightly for a more unique design.
Picture
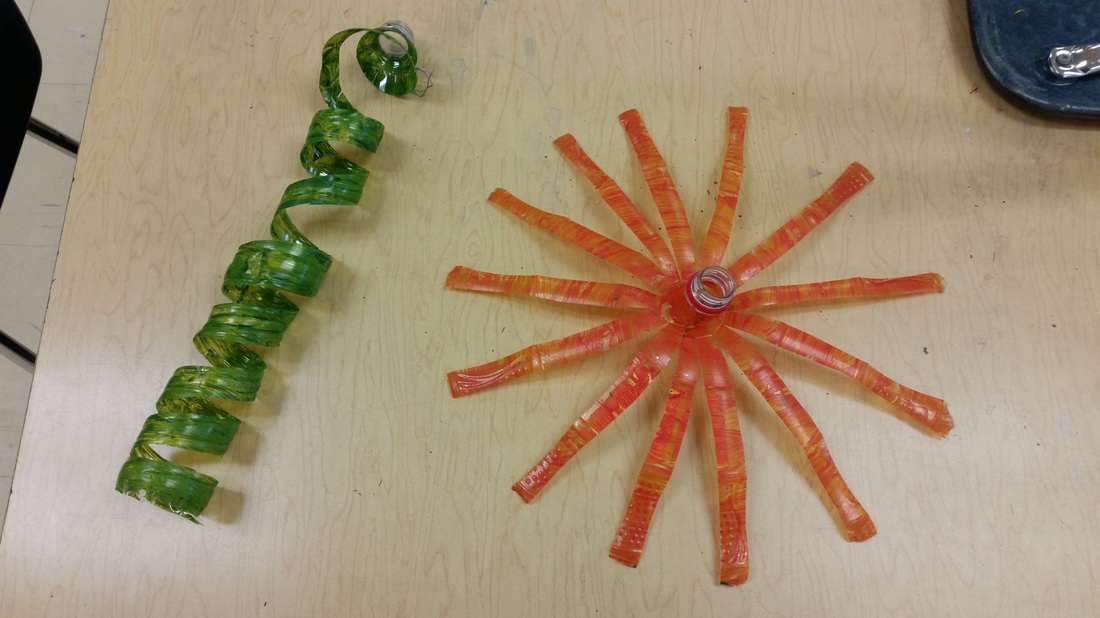
Star & Spiral designs
On the first day, I showed students YouTube clips of Dale Chihuly's work. I also showed them the glass blowing process...which they adored! Students started sanding their bottle with sandpaper and then painted their bottle using acrylic paint. Our inspiration for this Chihuly-inspired sculpture came from his work "Fireworks of Glass" pictured at the right.

On the second day, students cut apart their bottles and used wire to attach the bottles to a chicken wire frame. I inserted Christmas lights I bought on sale after the holidays to add lights to the inside of our sculpture. When students were finishing, I gave them three options for what they could do when they were done:
-Draw our sculpture using colored pencils
-Write about an artwork by Dale Chihuly
-Make another plastic bottle to add to the sculpture

Most students chose to make another plastic bottle to add to the sculpture! I loved how it turned out with all of the bright & interesting colors. Look below for more inspiration and pictures.
Picture
"Fireworks of Glass" by Dale Chihuly
Picture
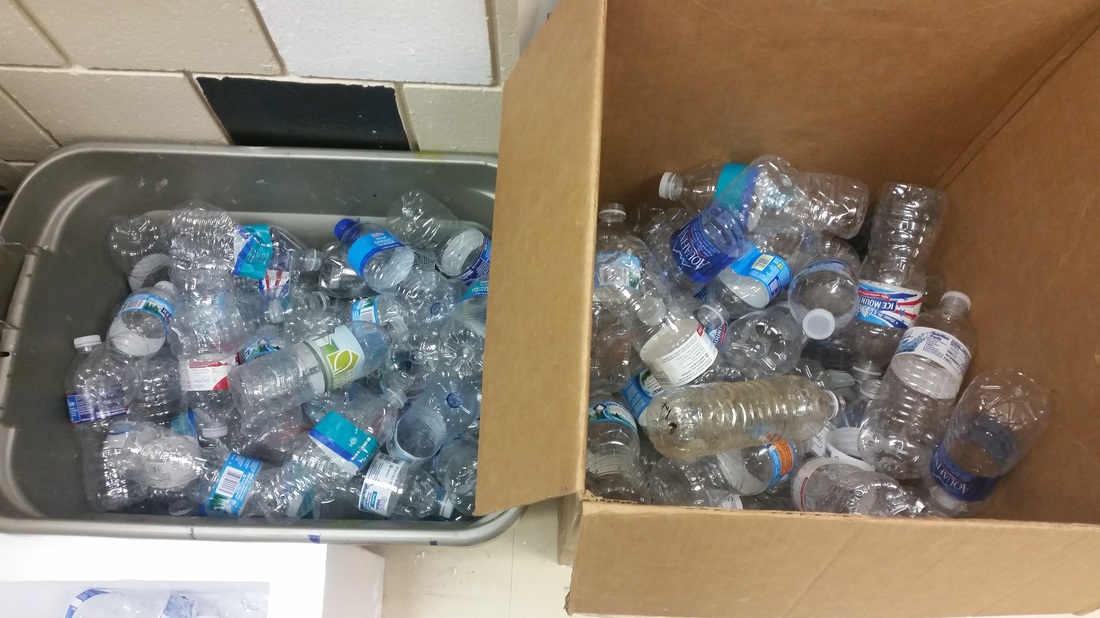
We collected over 270 plastic bottles!
Picture
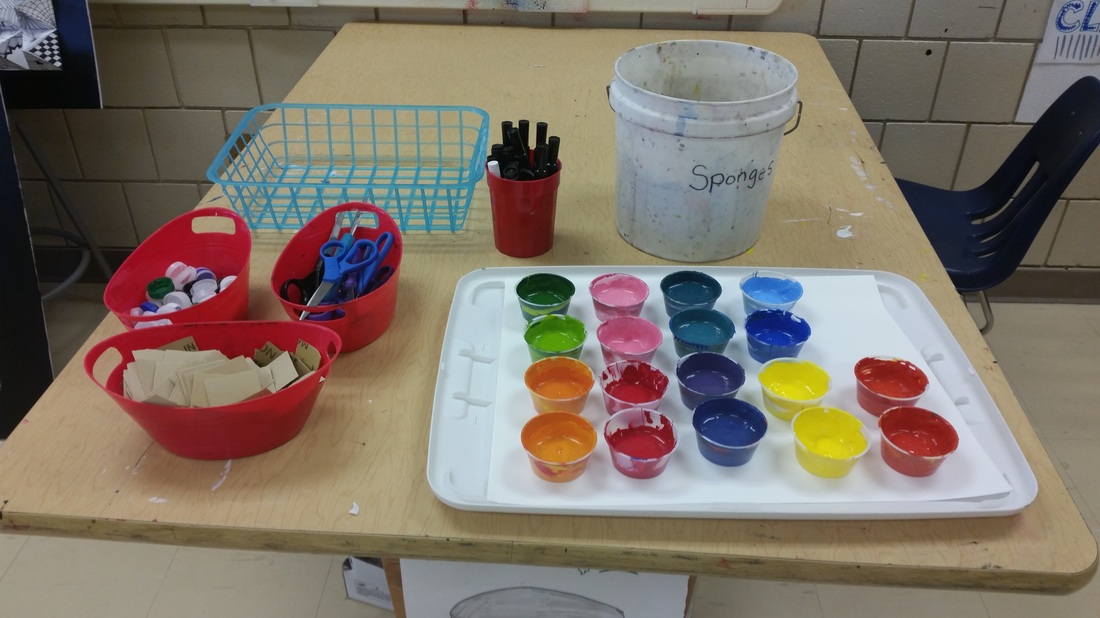
I premixed colors to save time, but you could have your own students mix their own colors!
Picture
Bottles drying in the cupboard on Day 1
Picture
Picture
Chicken wire frame with christmas lights. I used ribbon to suspend it from the ceiling.
Picture
Picture
Picture
Picture
Picture
19 Comments

The Warhol Project

4/2/2014

0 Comments

 
Picture
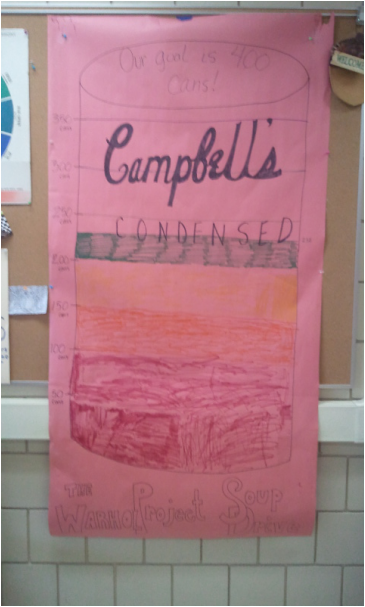
A while back I had stumbled upon the website of a teacher who did a "soup drive" along with her Pop Art project. I thought this was such a cool way to get students involved with art history and their community! I took this teacher's (I have no idea who she is) idea and ran with it. I created what is now called, "The Warhol Project". For the last month, students have been bringing in cans of food where we will be donating them to Channel One Food Bank in Rochester, MN. Our goal is 400 cans by the end of May. We already have 238!
Picture
We keep track of how many cans we've collected on a large Soup Can that some 6th graders helped me create. This is our giant soup can goal meter at the front of my classroom!
Picture
Picture
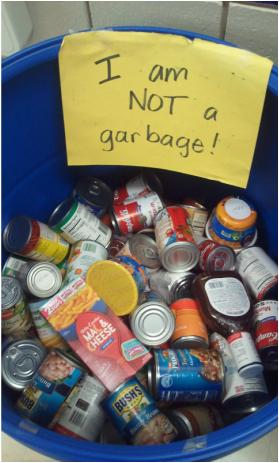
We are collecting our cans in two large barrels that Channel One kindly gave us. It's not a bad idea to put a sign on them that states they are not garbage (I encountered I few issues there...)


Last semester we made pop bottles (Pop Art...get it?) on the benday dots handout. We used markers and colored pencils for that project. This semester, I plan on having students draw soup cans in their table groups and use the benday dots handout I used last semester. I think I will teach students how to use watercolor pencils instead of using regular colored pencils and markers. I think it would be interesting for students to use complementary colors in this project as well.


I just love how the students (and parents!) have shown so much enthusiasm and generosity by donating to our soup drive! Stay tuned for the next part of The Warhol Project: Drawing our soup cans!

0 Comments

End of Semester Classroom Art Show

1/24/2014

0 Comments

 
I decided at the beginning of the semester that we would end the semester with an in-class art show.

Each student was asked to choose their best work that they completed in class. They were then asked to create an "artist's card" that identified their artwork. They were asked to include the following:
  • Title of artwork
  • Name of artist
  • Date created
  • Media used
Picture
Clothespins glued to scrap mat boards made excellent hanging devices for student work. Plus, they can be moved around and reused!
Picture
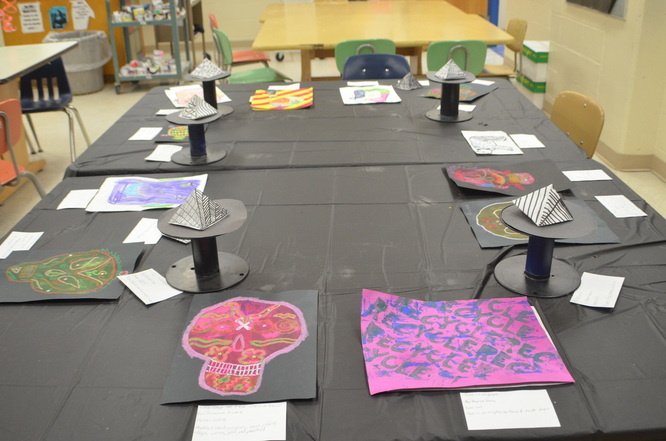
I used disposable black tablecloths on the tables and reused old wire/thread spools as pedestals for the 3-D work. The image above shows how I hung up the larger artworks using scrap mat boards and clothespins. Students were asked to fill out an "Art Sandwich" about the artwork created by the student to their left. We talked about writing respectful comments and using professional language. Since this was our last day, I brought snacks and pop for the kids to munch on while they looked at each other's work. Overall, I think it was a great success and such a great opportunity for students to experience an "art show". We had a few minutes of spare time, so I showed them this "Latte Art" video. Kids had a lot of fun trying to figure out how it's done.
0 Comments

Grid Drawings . . . Lesson in the Works!

1/12/2014

0 Comments

 
Picture
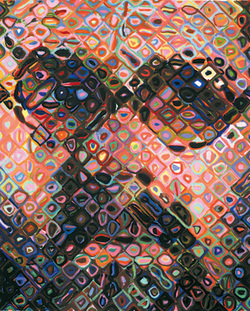
The end of this semester has proved to be quite busy. We are currently working on our birchbark boxes and will hopefully be finished by the end of this week. I will be moving schools for the second semester and that means an entirely new group of students. It also means that I am working on planning the curriculum for this second semester. 

As an artist who likes to work in a variety of mediums, I am definitely one who likes to try new things and experiment with different lesson plans. A few of the projects we did last semester (pop bottle drawings and zentangle pyramids) will be repeated but I will be teaching many new projects this second semester. One project I have been dying to have students try is a large-scale collaborative grid drawing. I think I will be doing this project instead of the Chihuly sculptures with this group of students.

I took inspiration for the grid drawing lesson from Chuck Close's gridded portraits. This lesson is still in the works, but I think it will be a great lesson on drawing what we SEE, rather than what we think we see. This is something I know a lot of 6th grade students struggle with and breaking it down into 5"x5" square chunks should ease frustration. The 7th & 8th graders do their own personal grid drawings and this should be a nice precursor for building up background knowledge of grid drawing.

I chose six artists and their portraits for this lesson. I copied and pasted their images into a word document and overlayed a 7"x9" grid over each image. I applied the artistic filter "pencil sketch" over each image to show contour lines more effectively.

The Artists:
  • Andy Warhol
  • Georgia O'Keefe
  • Kara Walker
  • Frida Kahlo
  • Andy Goldsworthy
  • Salvador Dali


The hardest part was narrowing my choices down to six artists. These may not have been your own choices, but my criteria for selecting artists was based on the lessons I will be teaching throughout the semester and I wanted to represent different cultures and show a balance of both men and women artists.

I plan on printing each gridded artist image twice. I will use my paper cutter to cut out each small 1"x1" square from the image. I will then label the back of each square with a number so we can keep track of which image goes where. Then I will give students a handout for the project with a 5"x5" square box to draw in. Each student gets a small 1"x1" square and will be asked to transfer the 1" box into the 5" box on the handout. I plan on showing students examples of what we are doing, but not what our final image will be. I like a little mystery! :) Once students have their drawing in pencil finished, I'll have them color with markers or colored pencils. I will be testing this project out myself to see how it works before teaching it. The worst case scenario is that it doesn't turn out to look like a portrait.

Each final work will be a combination of two art classes (approx. 30 students in each class). The final work will be 35"x45" in size with a total of 63 5"x5" squares in each work.

Time required: 2 (50 min.) class periods

You can see the document I created with the six artist images below. I will keep you posted about how this project works out!

grid_posters.pdf
File Size: 8631 kb
File Type: pdf
Download File

0 Comments
    Picture

    Mrs. Quam

    I am a 7th year high school art teacher  in Rochester, MN. I have taught middle school for 2 years and high school for almost 5 years. I truly enjoy working with students on a daily basis. I also enjoy teaching real-world skills such as problem solving, using technology, and the power of teamwork and collaboration. My joy is sharing my passion for art with others!

    Archives

    March 2020
    February 2020
    January 2020
    March 2019
    February 2019
    January 2019
    October 2018
    August 2018
    July 2018
    May 2018
    April 2018
    March 2018
    February 2018
    January 2018
    December 2017
    October 2017
    July 2017
    June 2017
    February 2017
    June 2016
    April 2016
    March 2016
    January 2016
    December 2015
    November 2015
    June 2015
    May 2015
    April 2015
    February 2015
    August 2014
    July 2014
    June 2014
    May 2014
    April 2014
    March 2014
    February 2014
    January 2014
    December 2013
    November 2013
    October 2013
    September 2013

    Categories

    All
    Abstract Art
    Art History
    Art Show
    Burrito Book
    Ceramics
    Chuck Close
    Classroom Management
    Collaborative
    Color
    Color Wheel
    Community
    Conferences
    Dale Chihuly
    Digital Art
    DIY
    Drawing
    Expressionism
    Final Exam
    Games
    Graphic Design
    High School Art
    Illustration
    Islamic Clay Tiles
    Living Sculpture
    Logo Design
    Medieval Art
    Middle School Art
    Modigliani
    Multicultural Art
    Native American Art
    Oil Pastels
    Parents
    Pattern
    Perspective
    Photography
    Pop Art
    Printmaking
    Sculpture
    Self-portraits
    Shepard Fairey
    Sketchbooks
    Social Issues
    Strategies
    Summer
    Teaching Tips
    Technology
    Tools
    Visual Journals
    Wayne Thiebaud
    Zentangles

    RSS Feed

    Picture

    Other Great Blogs:

    • Carly Correa
    • Dali's Moustache
Powered by Create your own unique website with customizable templates.
Photo used under Creative Commons from Rob Qld
  • Home
  • Portfolio
  • About
  • Curriculum
    • Graphic Design & Digital Art 1
    • Graphic Design & Digital Arts II