Art Teacher Diaries
  • Home
  • Portfolio
  • About
  • Curriculum
    • Graphic Design & Digital Art 1
    • Graphic Design & Digital Arts II
Mrs. Quam's Art Teacher Diary
​Art lessons, resources, images, and more for visual art and graphic design classes. 

6 Classroom Games that Relate to Art and Graphic Design

3/10/2020

1 Comment

 
I've recently been trying to incorporate more fun into my art classrooms. My goal is to get students excited to come to art and graphic design class. One thing I've found that brings joy-- and even some social and collaboration opportunities-- is using games. I don't typically play an art-related game for an entire hour, but the following are art-related games I've researched and many that I've tried out in my own high school classrooms. Many of these games could be modified for younger students too.

#1 Exquisite Corpse

Picture
Don't let the morbid name scare you. It started as a Surrealist game in the 1920s and is similar to a Victorian-era parlor game called Consequences. Exquisite corpse is a great get-to-know-you activity for middle and high school students. It lets kids practice drawing skills too-- even if they feel like they aren't good at art. This one even gets my high school kids laughing like crazy.

Skills & Key concepts: Drawing, collaboration, imagination, character design, anatomy.
Time Required: About 10-15 minutes.
How to Play:
  1. Each student gets a paper. Have students write their name at the top right or left. 
  2. The paper can be portrait or landscape. Each student folds their papers into thirds of fourths horizontally across the paper. Then they open up their papers.
  3. ​Have students sit in random groups.
  4. Start by instructing students to start at the top part of the fold and draw a "head". I give students about 3 minutes to draw each body part. They can add color too.
  5. When time is up, I instruct students to fold their section towards the back so the next student can't see it. I do instruct students to continue some of the lines down slightly into the next section to help the next student out.
  6. Next, have students pass their papers to the right.
  7. The second section is the "abdomen". This could include the chest, stomach, and arms. After time is up, students pass their paper to the right.
  8. The third section is the "lower half" or just "waist and legs". I usually have to tell high school students to be school appropriate here-- no naked butts :)  After time is up, students pass their paper to the right.
  9. If doing four sections, the last section I call "Feet and ground". Students can add feet and a surface for the character to stand on.
  10. When finished, students pass their papers back to the original owner and open them up! Be ready for roars of laughter!
Picture

#2 Pareidolia Scavenger Hunt

I have used this in graphic design classes when introducing our photography unit, but you could do this in any class.

How to Play:
After showing the short video below, I give students 10 minutes to pair up and find as many "faces" as they can made of inanimate objects. I tell them they may have to rotate their camera, zoom in, or crop areas to get the best effect. I let students roam the classroom, go outside if the weather is nice, and even the hallways, cafeteria, and gym if allowed. Students record their finds with a smartphone, classroom camera, or iPad. Students can upload photos to a google classroom post. After time is up, the team with the most (or funniest) pareidolia photos wins!
​
​Check out this article for more info:
https://futurism.com/pareidolia-why-we-see-what-isnt-there
Picture
Skills & Key concepts: Photography, composition, creativity, teamwork
​

Time Required: About 10-15 minutes to take photos and 15-20 minutes to look at everybody's photos afterwards

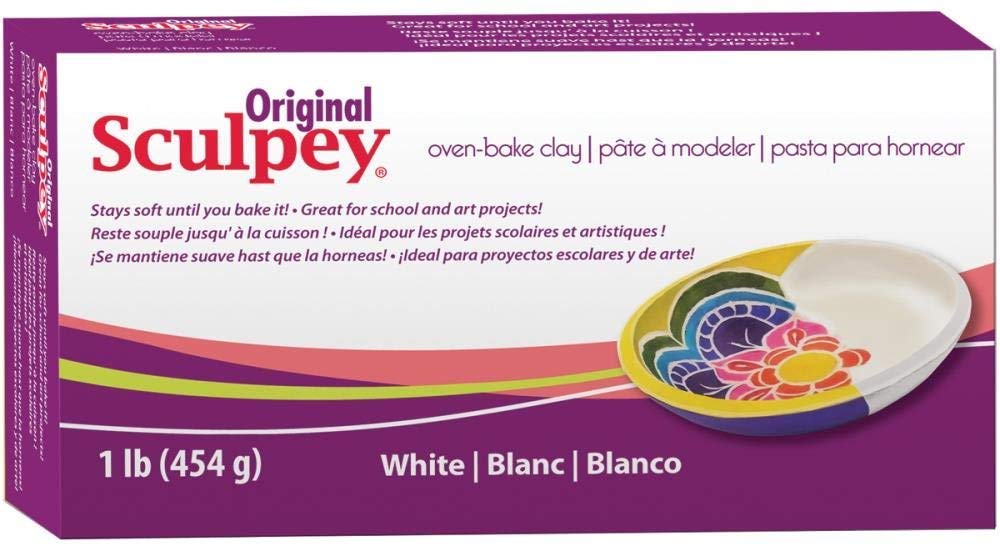
#3 Sculpey Pictionary

Have I told you how much I love sculpey? It doesn't dry out in the air, I can leave it in a box for ages, far more forgiving than genuine clay, and it's awesome for kids who just need to fidget!

How to Play:
Sculpey Pictionary is fairly easy to understand. I give each group of kids a 2-minute timer (like the ones to the right) and a ball of Sculpey about the size of a small apple. I cut up strips of paper with different words and put them in a bucket for each group of kids. Students take turns drawing a word and they have to sculpt it using the Sculpey in under two minutes. If one of their group members guesses correctly, the sculptor (and the student that guessed it right) gets a point! We play several rounds and then the player with the most points from each group wins (usually some candy or pencils from my "prize" box).

Skills & Key concepts: Sculpting, clay, 3-D design, vocabulary
​

Time Required: I typically do this for a full 50 minute class hour but you could probably do it in 20-30 minutes with smaller groups.
Picture
Picture
These inexpensive 2-minute timers are a great resource to have in the classroom! They aren't noisy too!
Picture
A 1 lb box of Sculpey is enough for about 6-8 groups. Divide the Sculpey up-- you may need to warm it up with your hands-- and let kids get creative!
Need a list of pictionary words? Here are 138 different words at different difficulty levels I created for my classes. Download them free by clicking here!
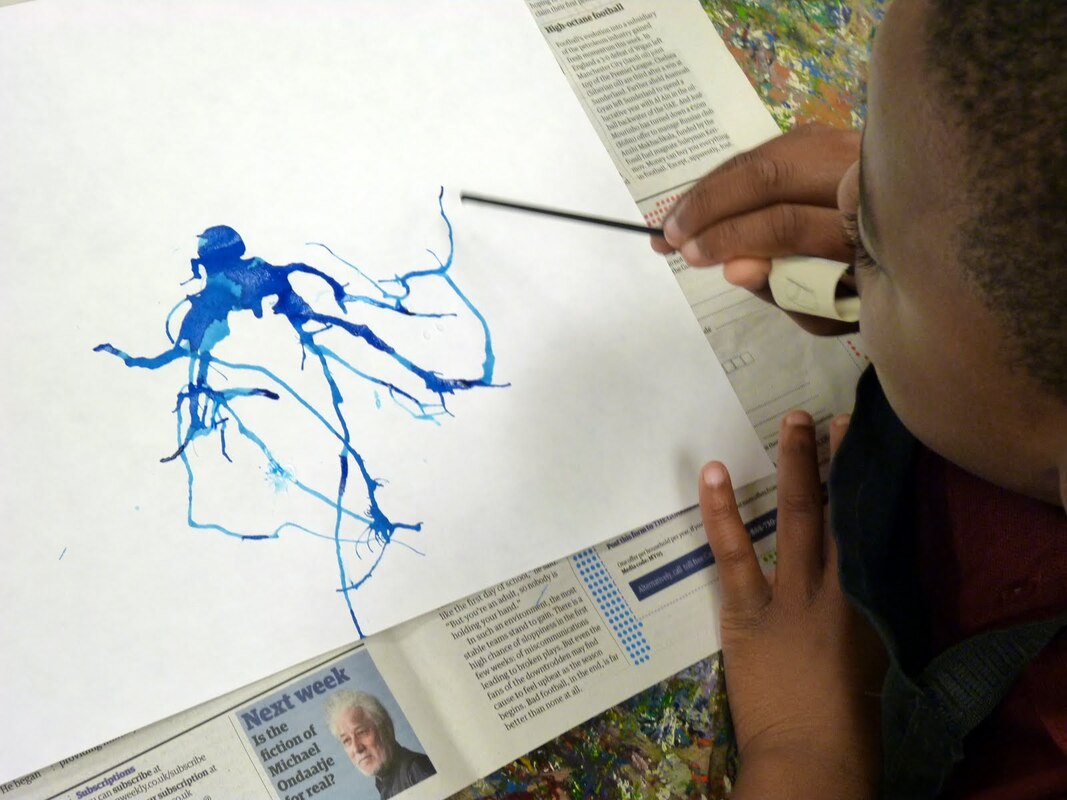
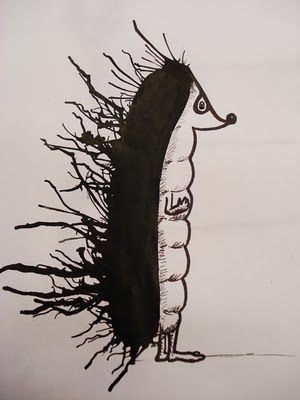
pictionary_words.pdf
File Size: 31 kb
File Type: pdf
Download File

#4 Ink Blowing

Picture
Skills & Key concepts: Creativity, line quality, imagination, collaboration

Time Required: I give students about 15-25 minutes to do this activity.
Picture
Picture
Super simple. Super fun. All you need are some straws, heavier paper, India ink, newspapers, possibly markers, and some brushes/calligraphy pens.

How to Play:
1. Give students a few drops of India ink (or even watered down paint) on a thicker paper such as mixed media, watercolor, or tagboard paper. 90# or more works best. Put newspaper or scrap paper underneath to catch any ink drips.
2. Next, give students a plastic straw. I cut the straw in half to save on over-using the plastic. You could also use paper straws instead!
3. Now let students blow the drops of ink all over their paper by blowing through the straw. Students are not allowed to use their hands or brushes-- only their straw! I give students about 5 minutes to do this.
4. When students are done, instruct them to think about what they could make out of these ink blowings. OR to make it more challenging, I pair students up randomly to exchange their papers. Then they have to think about what they could make out of someone else's ink blowing.
5. Students then proceed to use India ink with brushes, markers and/or calligraphy pens to turn their ink blowing into something more recognizable or interesting. I often allow abstract patterns and shapes too.
​6. When all students are done, we hang them up in the hallway for a quick gallery walk/critique.

This is a great way for kids to take a brain break and develop some creativity!

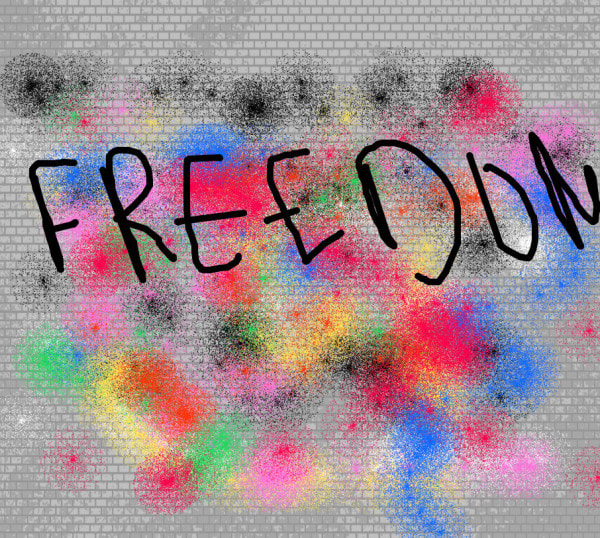
#5 Street Art Online Game
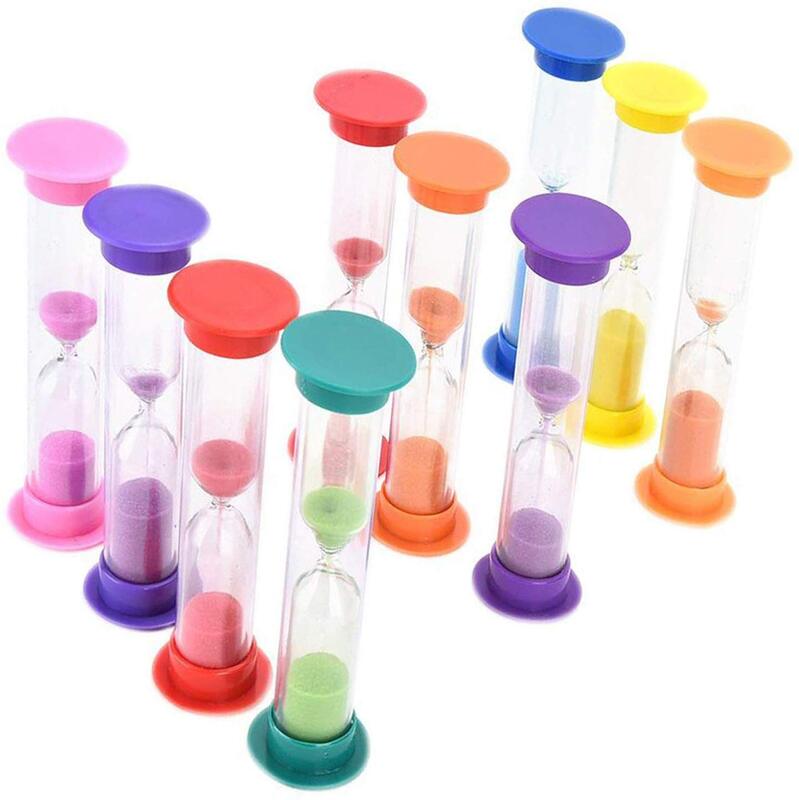
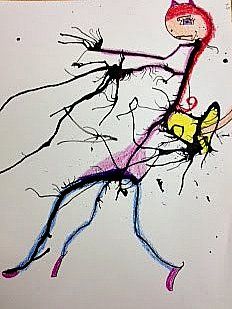
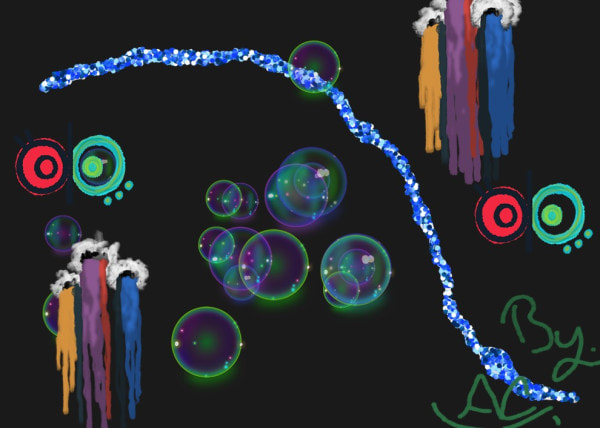
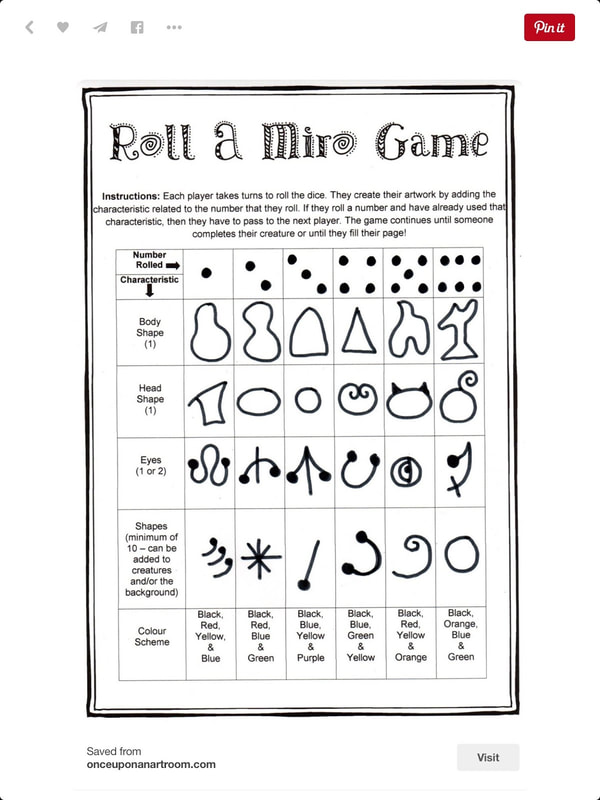
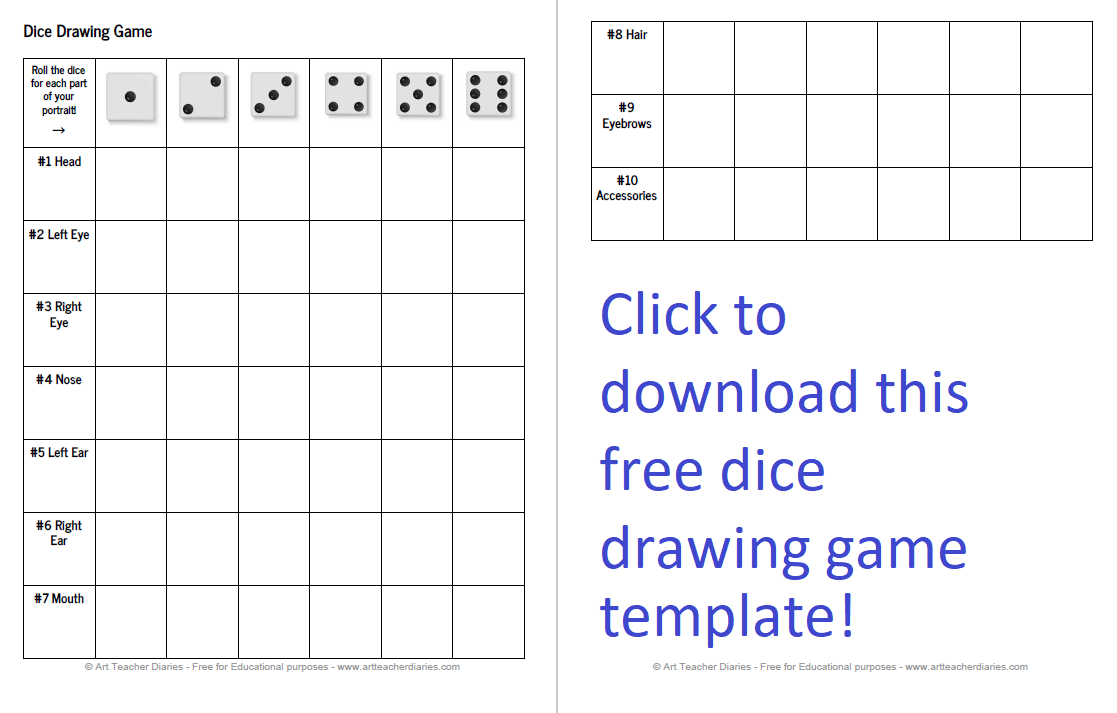
This game is online based, but it's kind of addicting so I had to include it.
This game was created by Tate and is available along with other art-related games on their website.
Visit here: https://www.tate.org.uk/kids/games-quizzes/street-art to check it out! I like that they provide examples of work that kids around the world have created on their website. You can see some examples to the right!

Skills & Key concepts: Street art, digital art, expressionism, computer literacy

Time Required: This ranges from a 5-minute activity to even longer for more complex works.
Picture
Picture

#6 Dice Drawing Game

Picture
Picture
Picture
Skills & Key concepts: Drawing, line quality, observational drawing, Cubism

Time Required: This usually takes about a full 50 minute class hour-- especially if I have students add color with markers, colored pencils, or paint!
Unfortunately I have not found the original source for this game since there are so many versions out there!

However, this game is super fun and not difficult to do with a variety of ages and abilities. I have created a blank PDF table (download it at the left or use the link below!) with the dice and different facial features. I have students draw ideas for head shape, left eye shape, eyebrows, etc. They can also write the ideas in words too.

Next, we roll the dice! I like the big foam dice found at the Dollar Tree in packs of two. They are quiet! However, you can also use an online-based dice roller such as https://freeonlinedice.com/. 

There are lots of teachers out there who have created different versions of these games. A quick search on Teachers Pay Teachers will reveal many options! However, I find that letting kids choose the "parts" makes it even more fun! You could even let kids work together to create all of the parts and collaborate. Feel free to download the dice drawing template I created below. It is free!
dice_drawing_game.pdf
File Size: 284 kb
File Type: pdf
Download File

1 Comment

Summer Art Class Projects

7/28/2014

0 Comments

 
Picture
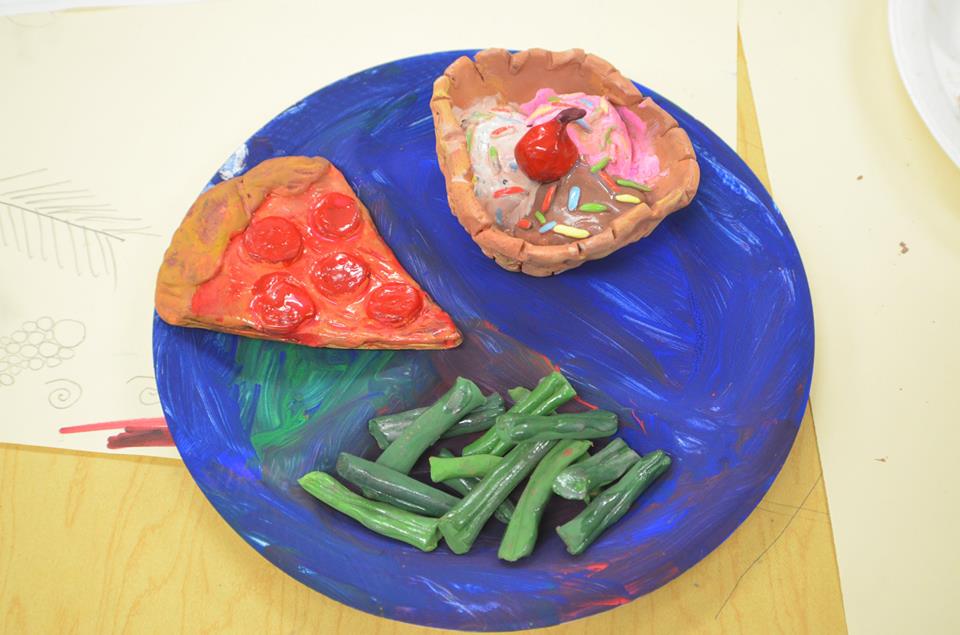
Air dry clay "food" that was painted to look realistic. This project focused on different construction techniques such as slab rolling, coil construction, pinch pot construction, and addition.
I decided to create two summer art classes that were each a week long through Community education in my district. The first class was called "Art Around the World" and featured projects such as a chinese lantern, making didgeridoos out of PVC pipe, and multicultural paper mache masks. The second class was called "Arts & Crafts Camp" and I definitely think this class was my favorite. The Arts & Crafts camp really let student's imaginations run wild and create some really cool art! Each class included students from the ages of 9 to 13. If you've never taught a community ed art class before, you should know it's a blast! No tests, no standards, just a room full of art supplies and enthusiastic students. For any other interested art teachers out there, I included the schedules for each class's days below for your reference.

Art Around the World
Day One- Mexican Folk Art terra cotta pots & Paper mache mask
Day Two- Australian Didgeridoos made out of PVC pipe with a beeswax mouthpiece
Day Three- African Adinkra printmaking on t-shirts
Day Four- Ukrainian painted eggs & Russian architecture metal tooling
Day Five- Chinese Calligraphy lantern & Free Art Time

Arts & Crafts Camp
Day One- Cardboard Challenge & Leather tooling/stamping
Day Two- Travel Posters & Clay food
Day Three- Dada-inspired lamp & Drawing to Music
Day Four- Metal tooling & painting clay food to look realistic
Day Five- Junk Sculptures & Hot glue fancy frames

Check out the photos below to see all of the cool art we created & tips for doing the same!
Picture
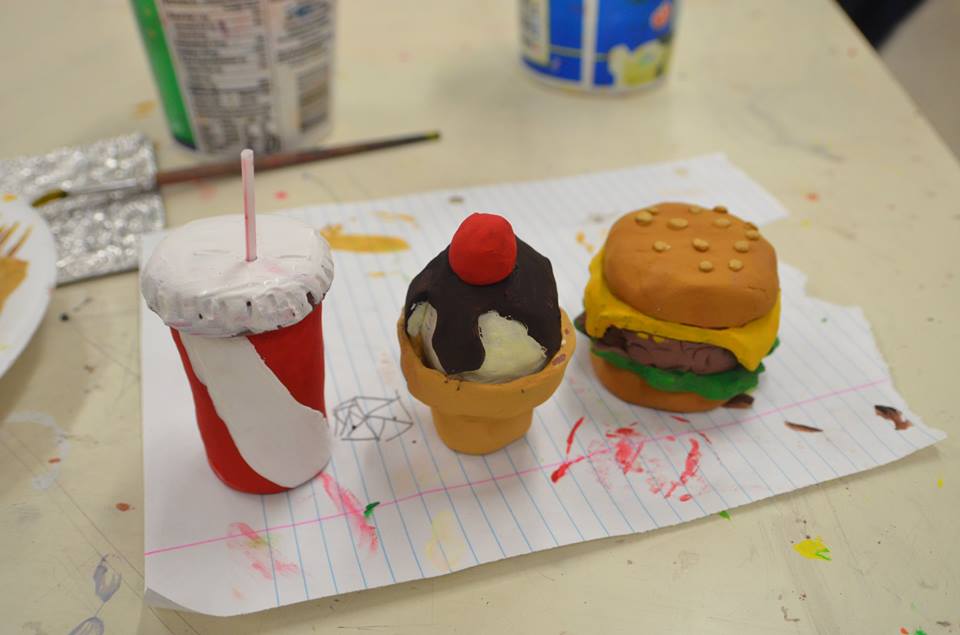
Clay food painted with tempera paint. The straw for the soft drink was cut from a q-tip. The student used a red sharpie to make the lines on the straw. Too cool!
Picture
Metal tooled tiles. Cut 38 gauge aluminum metal into 6"x6" squares. The foil I purchased was from Dick Blick and came in 12"x25 ft rolls for around $16. Fold a 1/2" over on each side to prevent injury. Use a blunt pencil to tool designs. I had students draw their design on scratch paper first and then put their paper over the metal and traced to transfer. Use colored sharpie to highlight the areas you tooled. You can also turn the metal over for an embossed effect.
Picture
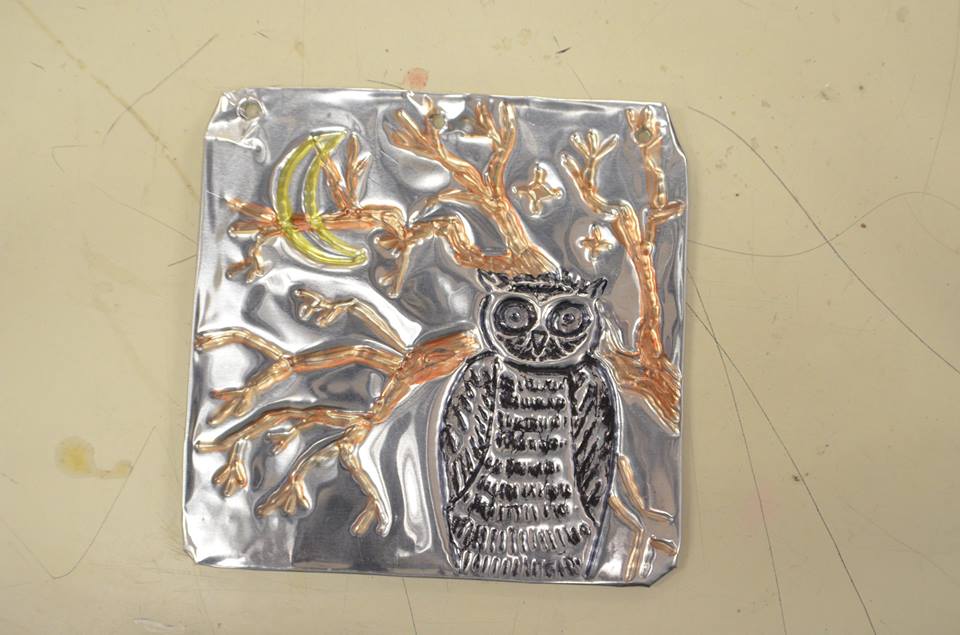
Metal tooled owl and tree. Hole punch holes in the top to add string or wire for hanging.
Picture
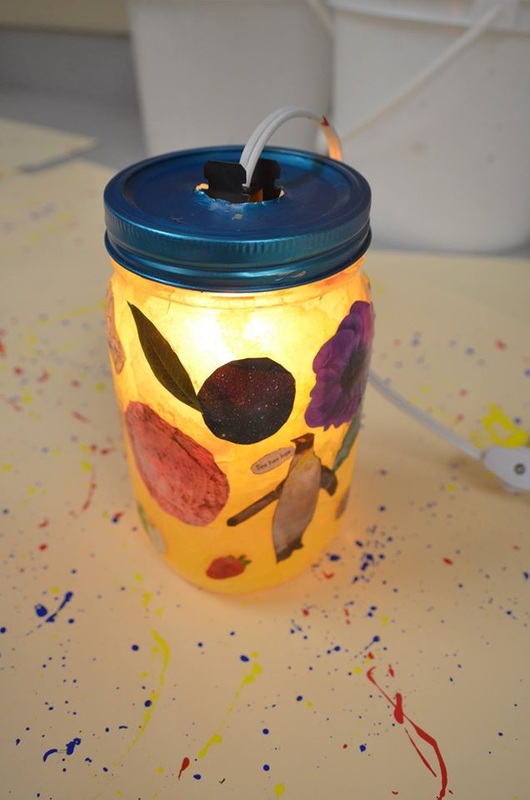
Dada-inspired mason jar lamps. We looked at a variety of different Dadaist artworks and I instructed students to choose a certain theme for the artwork. Some themes included, "Kids", "Save animals", "Be green", etc.
Picture
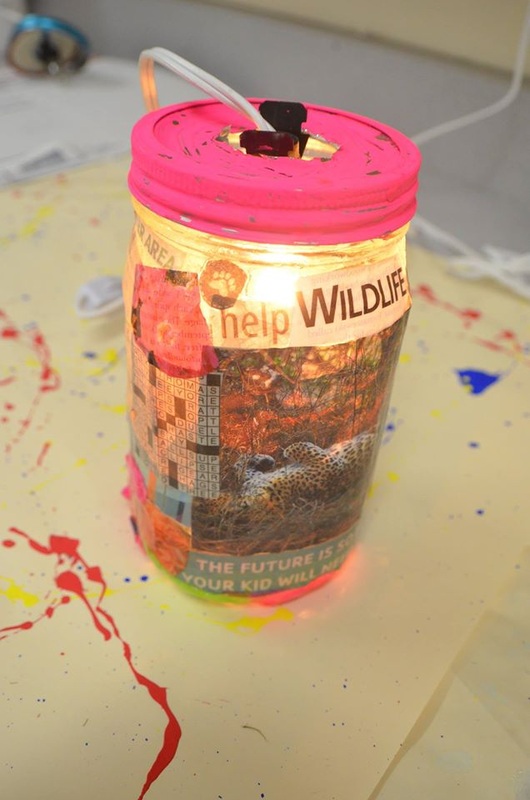
The lamps were created using pint size mason jars, socket light switch kit ($3.99 at Menards or other hardware store), modge podge, tacky glue, and an assortment of magazines and newspapers. Students decoupaged their cut outs onto the lamp using the tacky glue and modge podge. Some students used shredded up tissue paper and decoupaged the tissue paper to the inside of their lamp for a cool background. We used a nail to pound a hole into the lid and then used tin snips to cut a larger hole (this was mostly done by me due to sharp edges). Then the sock was inserted into the hole and a nightlight bulb placed inside that! The original project idea was for a hanging lamp, but some students designed their lamp to sit on a table. We simple cut a small notch in the lid for the cord, so the lamp could sit level. This was probably my student's favorite project!
Picture
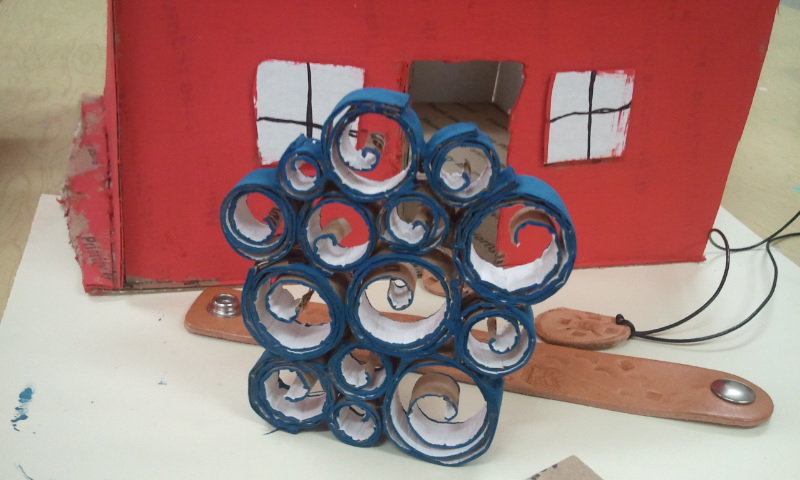
The first day we did the Cardboard Challenge. This was kind of a "get-to-know-you" activity for students. Students had to create ANYTHING out of cardboard using only scissors and glue (and later paint). This student spiraled cardboard strips and glued them together for a cool wall sculpture!
Picture
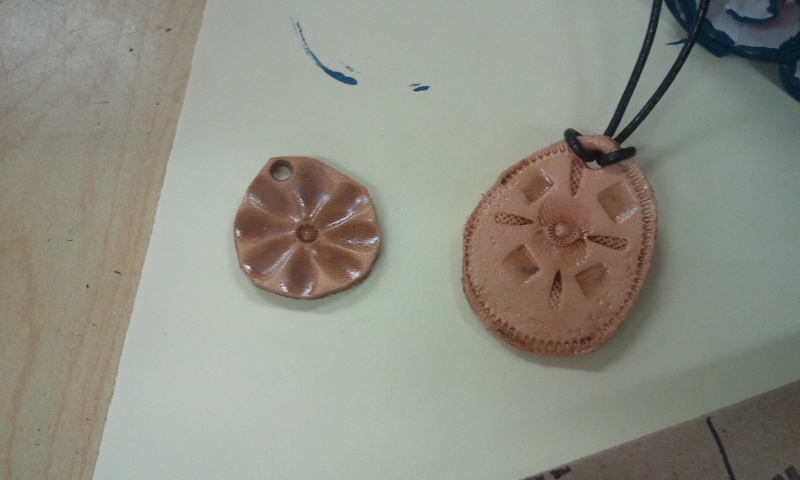
I had an assortment of different leather pieces and tons of tooling supplies for students to practice. Some students made necklaces and other students made key chains. I've never heard a class so quiet and focused on their work!
Picture
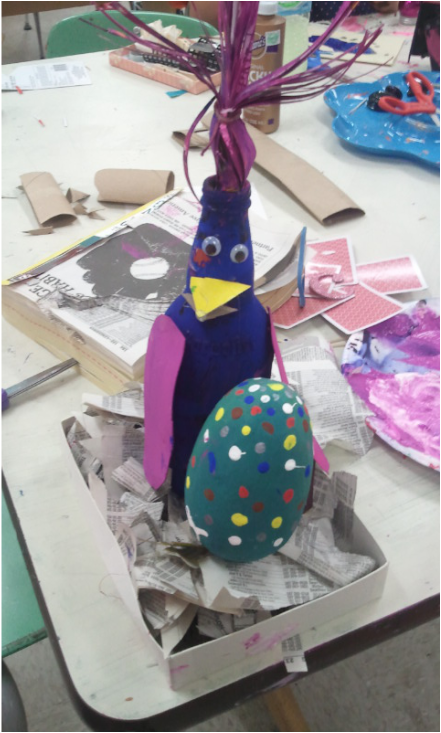
Junk sculpture bird with a leftover Ukrainian egg from the last class :)
Picture
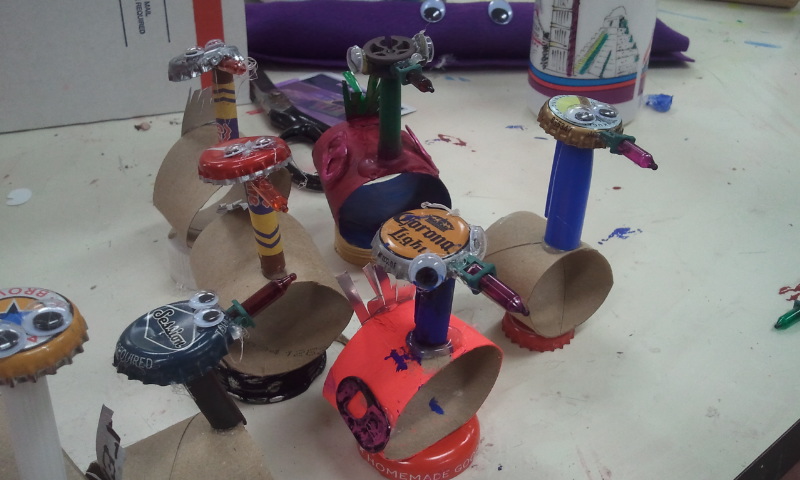
A flock of junk sculpture geese using old christmas lights, bottle caps, pen caps, crayons, and toilet paper tubes.
Picture
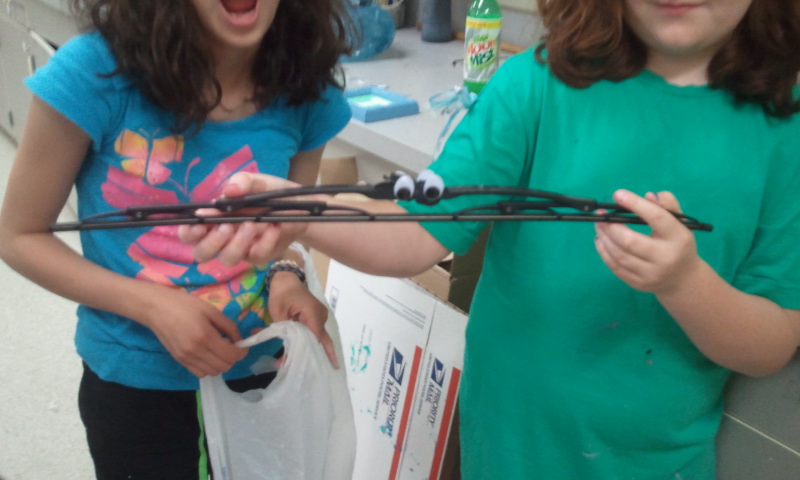
A wiper blade with google eyes. Fantastic.
Picture
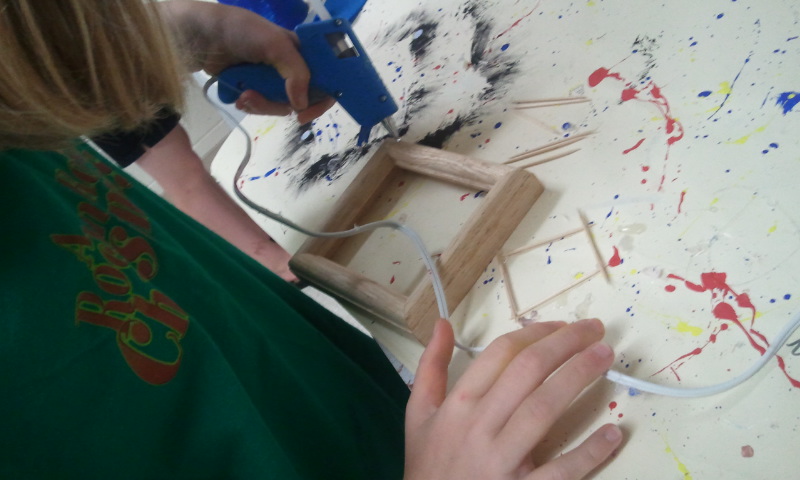
Hot glueing designs onto wooden frames. I won the 4x5" frames from an art conference!
Picture
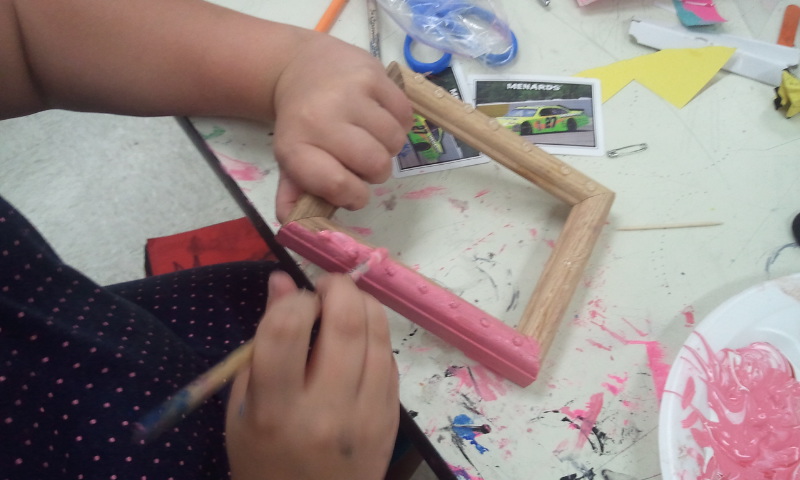
Painting the hot glued frames.
Picture
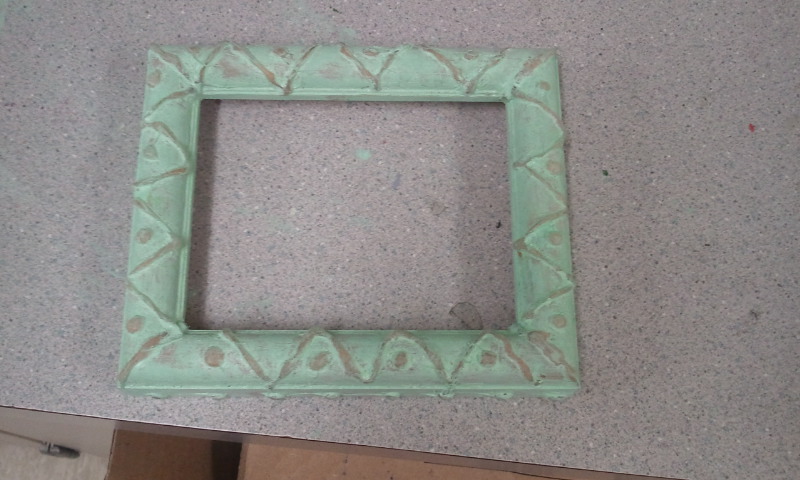
Finished hot glued frame that had been "distressed" with some of the paint rubbed off.
Picture
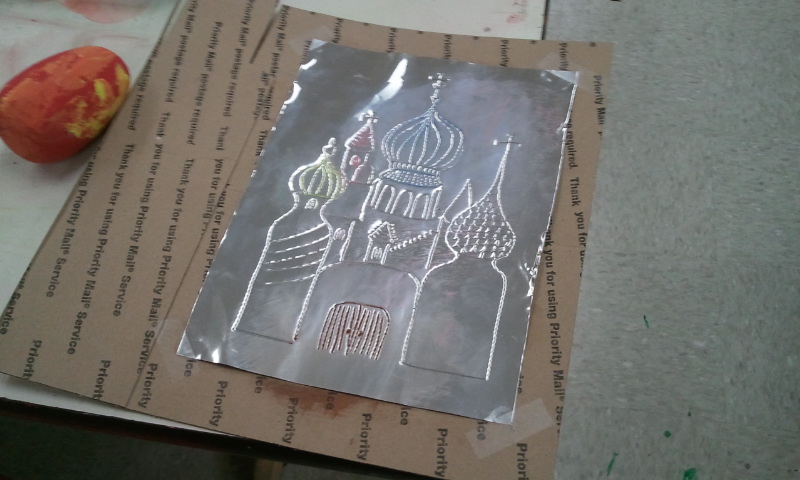
Metal tooling of Russian architecture for my Art Around the World class.
Picture
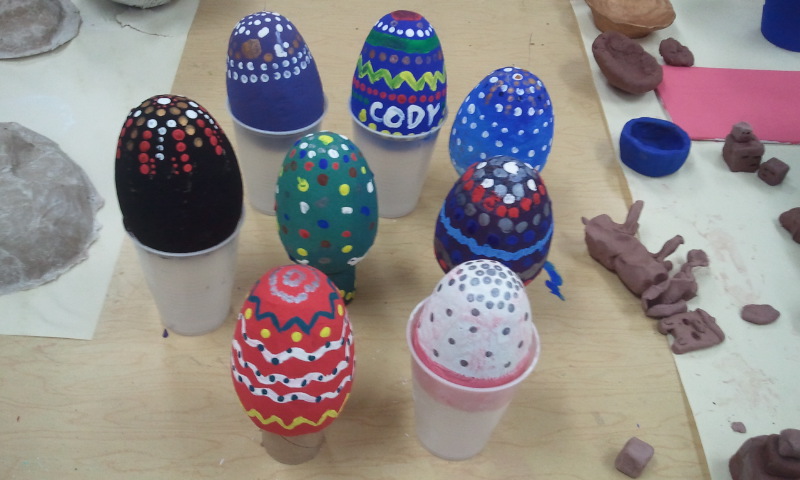
Ukrainian paper eggs. We discovered a cool way to hold the eggs was using a plastic cup, letting the paint dry, and then flipping it over. The eggs were 4" paper mache eggs purchased at Hobby Lobby for 99 cents each. We used q-tips for the dots.
Picture
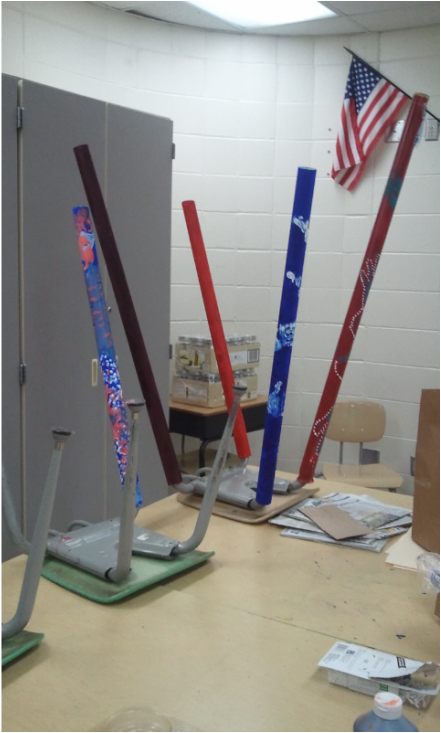
A cool way to work on the didgeridoo was actually discovered by accident! We placed didgeridoos on sturdy, over-turned chair legs so we didn't have to worry about smearing paint. 1 1/2" schedule 40 PVC was used and cut in a variety of lengths from 3.5 ft to 5.5 ft. Students sanded the PVC and then painted at least two coats of acrylic paint onto the PVC. Next, students took q-tips and paint to create aboriginal-inspired dot paintings on their didgeridoo. The last step was adding melted beeswax to the top to create a mouthpiece and a few beads/feathers for decoration. This project was student's favorite from the Art Around the World class!
Picture
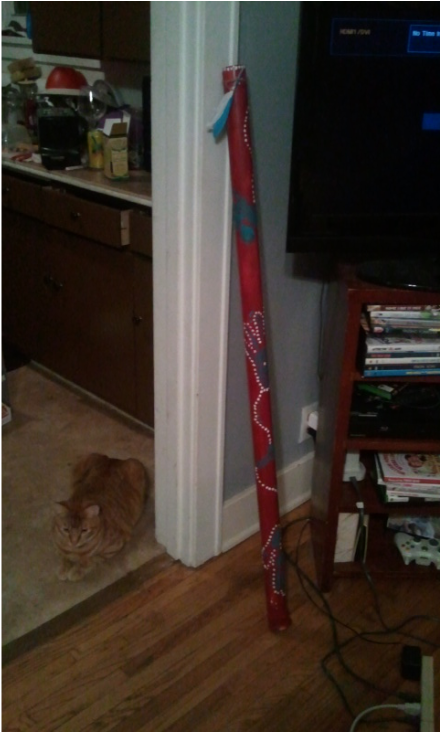
My own didgeridoo made out of PVC! Learning to play the didgeridoo wasn't too hard and I played some how-to videos for my students while we finished. Some students caught on really quick!
0 Comments

The Warhol Project

4/2/2014

0 Comments

 
Picture
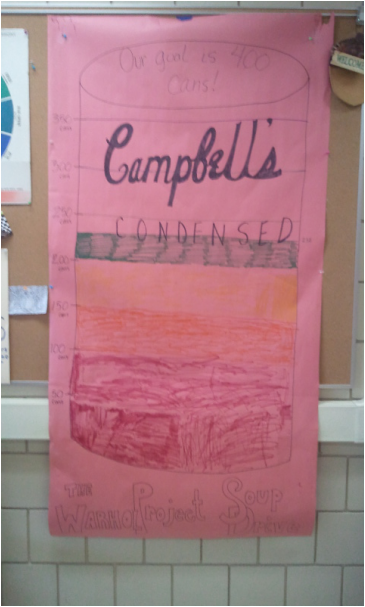
A while back I had stumbled upon the website of a teacher who did a "soup drive" along with her Pop Art project. I thought this was such a cool way to get students involved with art history and their community! I took this teacher's (I have no idea who she is) idea and ran with it. I created what is now called, "The Warhol Project". For the last month, students have been bringing in cans of food where we will be donating them to Channel One Food Bank in Rochester, MN. Our goal is 400 cans by the end of May. We already have 238!
Picture
We keep track of how many cans we've collected on a large Soup Can that some 6th graders helped me create. This is our giant soup can goal meter at the front of my classroom!
Picture
Picture
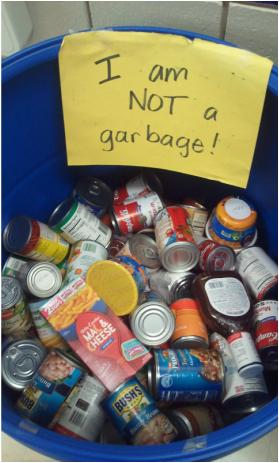
We are collecting our cans in two large barrels that Channel One kindly gave us. It's not a bad idea to put a sign on them that states they are not garbage (I encountered I few issues there...)


Last semester we made pop bottles (Pop Art...get it?) on the benday dots handout. We used markers and colored pencils for that project. This semester, I plan on having students draw soup cans in their table groups and use the benday dots handout I used last semester. I think I will teach students how to use watercolor pencils instead of using regular colored pencils and markers. I think it would be interesting for students to use complementary colors in this project as well.


I just love how the students (and parents!) have shown so much enthusiasm and generosity by donating to our soup drive! Stay tuned for the next part of The Warhol Project: Drawing our soup cans!

0 Comments
    Picture

    Mrs. Quam

    I am a 7th year high school art teacher  in Rochester, MN. I have taught middle school for 2 years and high school for almost 5 years. I truly enjoy working with students on a daily basis. I also enjoy teaching real-world skills such as problem solving, using technology, and the power of teamwork and collaboration. My joy is sharing my passion for art with others!

    Archives

    March 2020
    February 2020
    January 2020
    March 2019
    February 2019
    January 2019
    October 2018
    August 2018
    July 2018
    May 2018
    April 2018
    March 2018
    February 2018
    January 2018
    December 2017
    October 2017
    July 2017
    June 2017
    February 2017
    June 2016
    April 2016
    March 2016
    January 2016
    December 2015
    November 2015
    June 2015
    May 2015
    April 2015
    February 2015
    August 2014
    July 2014
    June 2014
    May 2014
    April 2014
    March 2014
    February 2014
    January 2014
    December 2013
    November 2013
    October 2013
    September 2013

    Categories

    All
    Abstract Art
    Art History
    Art Show
    Burrito Book
    Ceramics
    Chuck Close
    Classroom Management
    Collaborative
    Color
    Color Wheel
    Community
    Conferences
    Dale Chihuly
    Digital Art
    DIY
    Drawing
    Expressionism
    Final Exam
    Games
    Graphic Design
    High School Art
    Illustration
    Islamic Clay Tiles
    Living Sculpture
    Logo Design
    Medieval Art
    Middle School Art
    Modigliani
    Multicultural Art
    Native American Art
    Oil Pastels
    Parents
    Pattern
    Perspective
    Photography
    Pop Art
    Printmaking
    Sculpture
    Self-portraits
    Shepard Fairey
    Sketchbooks
    Social Issues
    Strategies
    Summer
    Teaching Tips
    Technology
    Tools
    Visual Journals
    Wayne Thiebaud
    Zentangles

    RSS Feed

    Picture

    Other Great Blogs:

    • Carly Correa
    • Dali's Moustache
Powered by Create your own unique website with customizable templates.
Photo used under Creative Commons from Rob Qld
  • Home
  • Portfolio
  • About
  • Curriculum
    • Graphic Design & Digital Art 1
    • Graphic Design & Digital Arts II