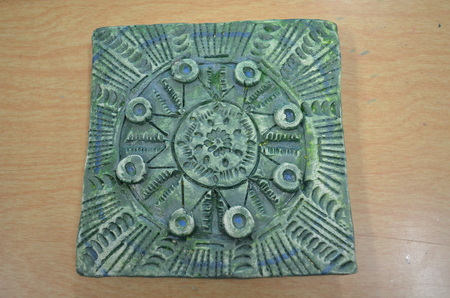
 I have seen many art teachers teaching Islamic tiles to middle schoolers. It's a fun lesson and I took it even a step further by teaching addition and subtraction. Students were required to create a 5"x5" clay tile using at least one piece of addition and one piece of subtraction. Students were also required to use radial symmetry in their design and use non-objective shapes, patterns, and lines (no smiley faces or names...or "peace" and "love for that matter). I made copies from the book "Decorative Tile Designs Coloring Book" and laminated them so each table had a reference point for designs. Some students knew exactly what designs they wanted to do and other students really struggled, so having these reference points helped a lot. This also lead into teaching about medieval stained glass windows. We also watched a short video about Buddhist mandalas (which my 6th graders REALLY got into!) Age: 6th graders Time required: 4 (50 min.) class periods for construction & 3 (50 min.) class periods for painting/finishing I created videos for each step of this project's process. These were my first instructional videos, so they are somewhat rough. I made these videos because we are limited on space and resources in the classroom. I also find that videos are much more engaging for students than a live demo. I had each class vote on whether I should do live demonstrations or videos and ALL the kids voted for the videos. It saves my voice too. 1st Step ~ Planning the Clay Tile (with Buddhist Mandalas for inspiration) Step Two ~ Rolling a Clay Slab Step Three ~ Making Designs in Clay Using Radial Symmetry & Addition/Subtraction Step Four ~ Finishing the Clay Tile Step Five ~ Painting the Islamic Tiles One problem we ran into was that many students did not sufficiently score/slip their feet so we had a lot or some fall off (we learn from experience, right!?). This was remedied by some epoxy glue and then having students paint their tiles once the glue had dried. I also made sure to make some extra tiles before firing and it was a good thing I did. One student's tile cracked into a million tiny pieces and another student promptly dropped theirs while it was still drying. I decided to be a nice art teacher and let these students have an extra I had made.
Some students used mica flakes after they had finished glossing their tiles. This added a unique sparkly effect while avoiding craft herpes (glitter). The Artist Statement I also had students write a one-paragraph artist statement answering the following questions:
The statement was low pressure as I told students they were graded for content and not spelling/grammar errors. This statement was part of my assessment to check for understanding. We finished these right before winter break. Some students were very excited to wrap their tiles up in newspaper and take them home as Christmas presents. I stole some paint sample chips from the local hardware store and hole-punched them in the corner. I told students they could use the paint samples as gift tags. They turned out so cool!
2 Comments
Karen Palmer
2/3/2019 08:53:57 am
Thank you for such a thorough and detailed lesson plan with lots of demonstration and useful information.
Reply
Rachael
4/5/2019 11:27:55 am
Thank you so much for this. I am making Islamic clay tiles with my class this summer. This is so perfect!
Reply
Leave a Reply. |
Mrs. QuamThis is my 11th year teaching art & graphic design! I have taught middle school for 2 years and high school for almost 5 years. I truly enjoy working with students on a daily basis. I also enjoy teaching real-world skills such as problem solving, using technology, and the power of teamwork and collaboration. My joy is sharing my passion for art with others! Archives
March 2024
Categories
All
|
Photo from Rob Qld


 RSS Feed

