|
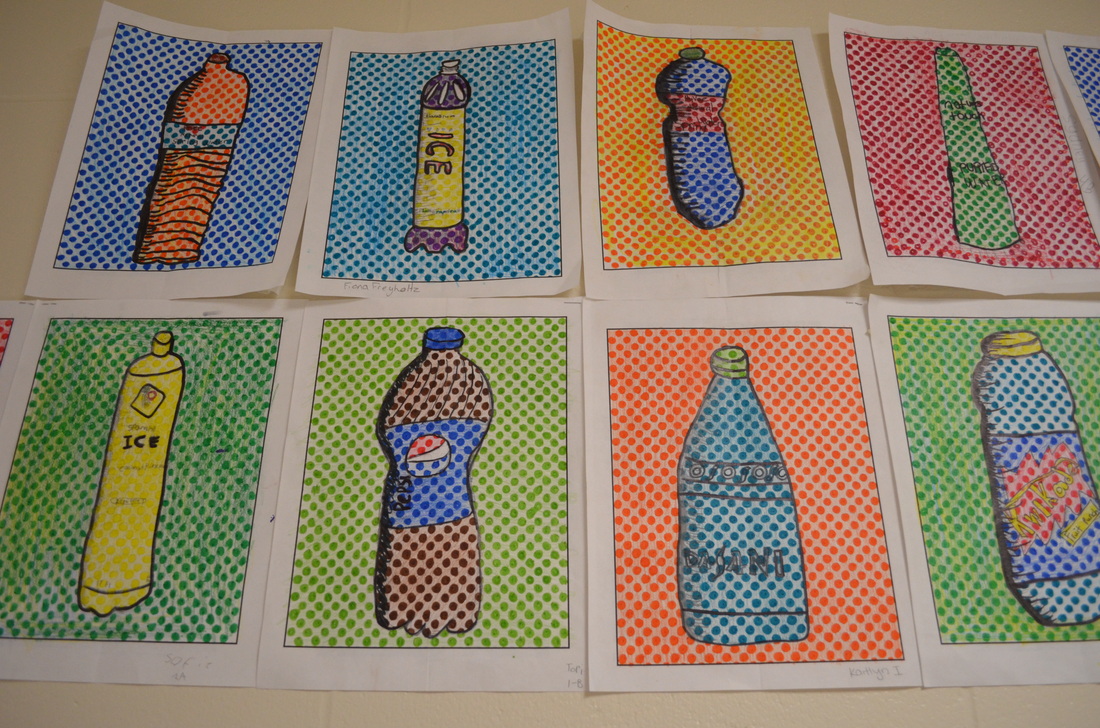
This was a project where students really impressed me. We had been collecting plastic bottles all semester long and so we had about 350 bottles stored in bags and boxes around the classroom. I knew I wanted to teach students how to draw perspective, but I was struggling on what. Then it donned on me-- plastic bottles! Each student chose a bottle to draw. We spent a whole class day talking about pop art and how pop art got it's name from popular culture. We also talked about how artists draw in perspective. They draw what they SEE, and not what they THINK they see. We also talked about how benday dots are kind of like pixels and how they create color when put close together (from far away, they look colored in....up close, they look like just dots). We also learned about creating value and how we could use hatching to show value in our bottles. I showed students comic book drawings that had hatching and this really had them motivated. Download the benday dots handouts!I have my benday dot handouts available in small dots and large dots at my TPT store We looked at several different pop artists including Andy Warhol, Robert Rauschenburg, and Claus Oldenburg....students kept saying that if you're a famous pop artist, you have to have a cool last name. ;)
Step One Students practice drawing their bottle. I had students fold their benday dot handouts in half and try to draw only one half of the bottle on one side of the folded line. This helped students get the symmetry right. Step Two They drew the other side of their bottle to match the opposite side. Students had to check the top and bottle of their bottles to make sure they were curved and showing correct perspective. Step Three Students draw the details of their bottle-- logos, fluid ounces, slogans, designs, etc. Students then added their hatching lines to make value. Step Four Students colored in their whole picture LIGHTLY with colored pencils. Students were required to mix the primary colors of colored pencils at least once in their drawing. If students had black on their bottle, I encouraged students to choose another color, as it covers up their benday dots so you can't see them. Step Five Next, students started coloring in the benday dots with markers. This was the most time-consuming part of the lesson. Some students got really impatient, but I had them take breaks to stretch and read some art books if they needed it. Students then outlined all their pencil lines in sharpie to really make it pop. Overall, once they were finished, students really seemed to like their work. When hung up together, they definitely have a "pop" art vibe!
6 Comments
Melissa
6/17/2014 10:41:35 pm
Reply
Kristy
1/11/2015 04:09:08 am
Thanks for the idea. I am the art docent in my son's sixth grade class. This year the focus is on Pop Art. This looks fun! Thanks.
Reply
Tammy
7/3/2015 02:54:49 am
Thank u for sharing the details of your lesson. I really like this.
Reply
michelle wilson
9/1/2016 07:00:33 am
Love this project.. Thanks for sharing
Reply
Robin Manzo
3/11/2019 09:04:35 am
This is an awesome project! I am a art teacher at a continuation high school in Magalia, California, which is now being conducted at the Boys and Girls Club in Chico, California. Our school was burned to the ground in the recent Camp Fire. I lost all of my project lesson hard copies that were in my classroom and am pretty much reinventing my curriculum. Because this is a time consuming process any help from other teachers is soooo wonderful.
Reply
11/6/2020 10:59:49 pm
I have a series of drawing experience. But left a more space...
Reply
Leave a Reply. |
Mrs. QuamThis is my 11th year teaching art & graphic design! I have taught middle school for 2 years and high school for almost 5 years. I truly enjoy working with students on a daily basis. I also enjoy teaching real-world skills such as problem solving, using technology, and the power of teamwork and collaboration. My joy is sharing my passion for art with others! Archives
March 2024
Categories
All
|
Photo from Rob Qld


 RSS Feed

